While there is one main reason to manufacture the Smart Doll body overseas (cheaper costs), there are a plethora of reasons why I decided to manufacture in Japan - despite the higher costs.
I work with vendors located throughout Japan on the various parts of the Smart Doll body and while the costs are on the high side, the workmanship over here is pretty much top notch meaning that I don't need to spend all my time traveling to somewhere overseas to watch the production line like a hawk.
The Making of Smart Doll
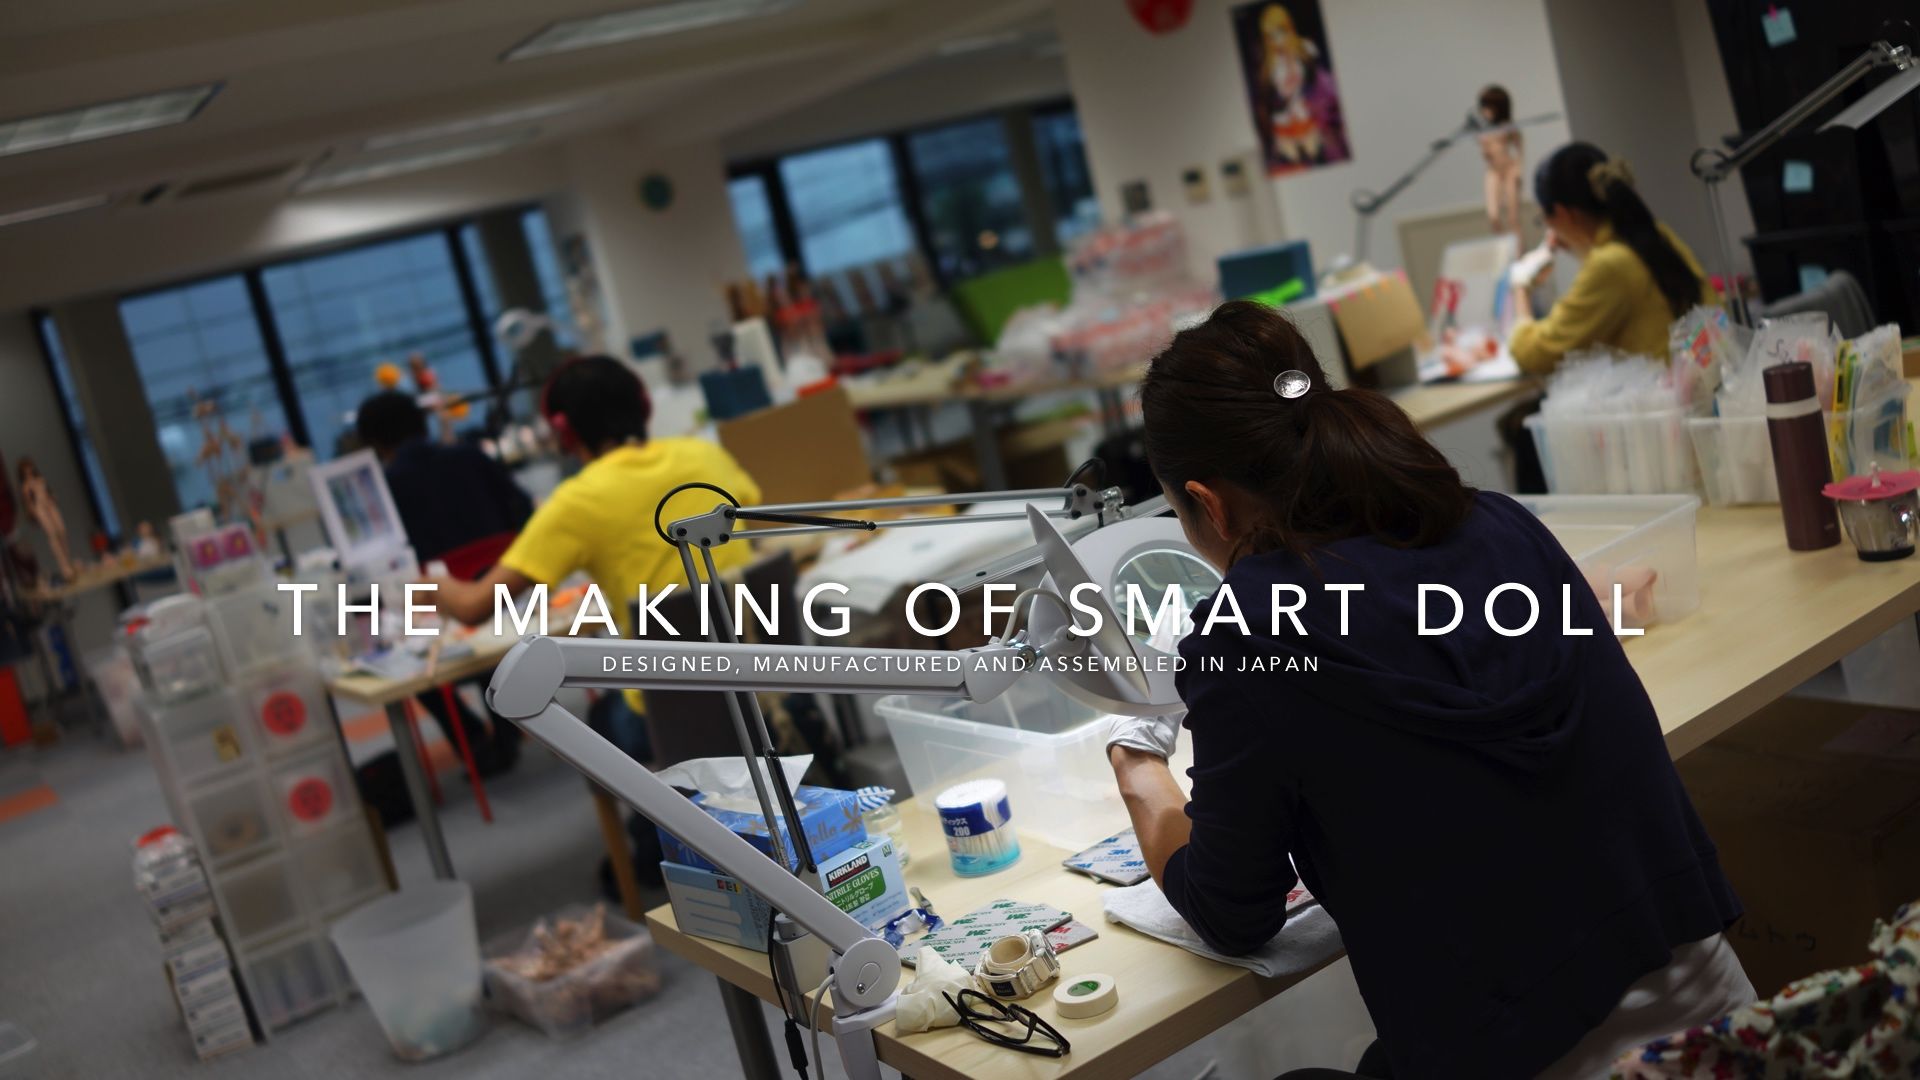
Designed, manufactured and assembled in Japan
I thought I'd talk a little bit about the production process to not only give you a better understanding of Smart Doll but also share techniques involved so that others can use the knowledge to make stuff too.
This section may be boring to some but it's important you know as much as possible about a product that you may be interested in forking out a ton of moolah on.
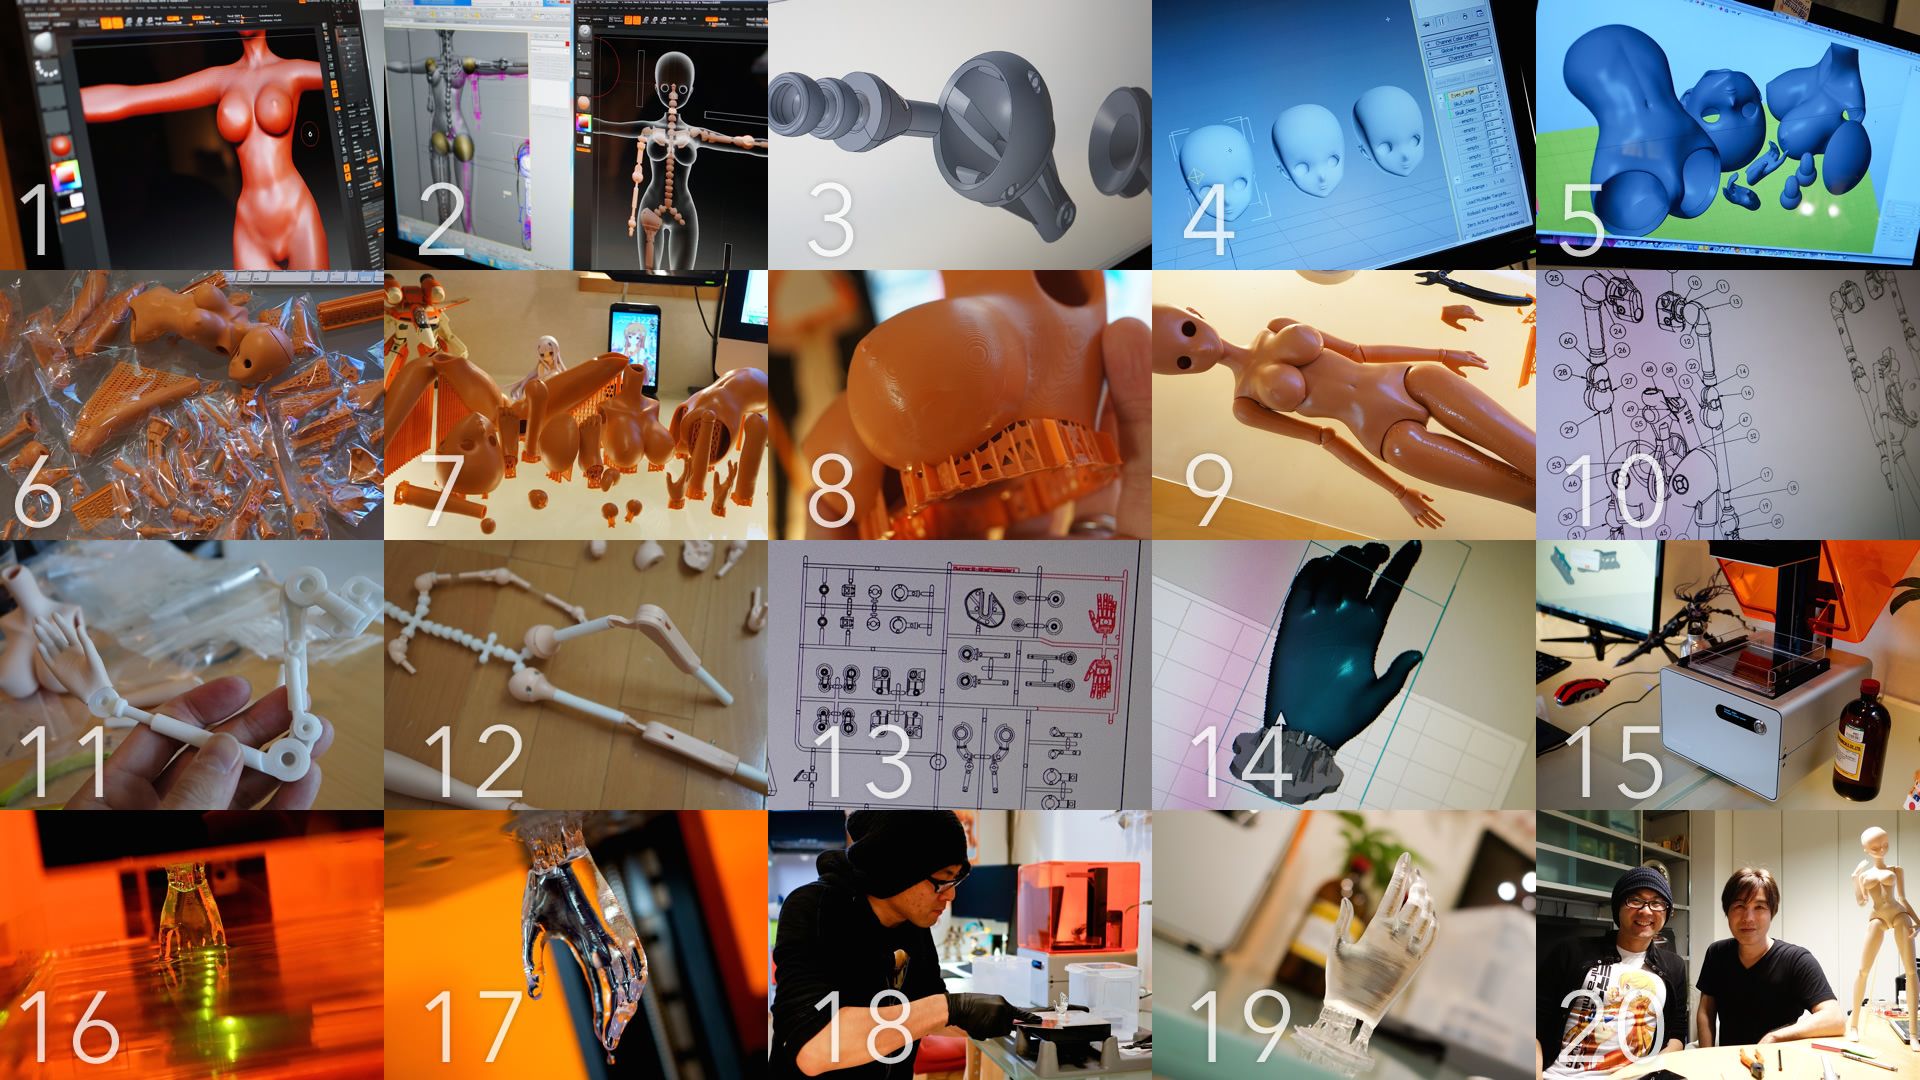
Design & Mold Preparation
- The software we use to sculpt the body is a 3D software package called ZBrush.
- ZBrush data is then imported into 3D Max for various tweaks and to make sure everything moves and fits together.
- We used two different types of CAD packages for the frame - SolidWorks and Pro/ENGINEER.
- The face is initially mirrored but then manually tweaked so that its not unnaturally symmetrical.
- We use a software called Netfabb to prepare the data for printing.
- Back then, I used a 3D printing service in Tokyo called Digimode - all I needed to do was to submit my STL data and a few days later they would send back the parts.
- Digimode used the Envisiontec Ultra rapid prototyping machine to print the parts.
- The bits that you see attached to the bottom of the bust are called Support Structures which need to be snapped off and sanded down.
- This is the first time I see my creation as a whole ^o^ The next step is discussed in the following section "Soft Vinyl Mold Preparation."
- Now that the body shell data is complete, we need to tweak the internal frame data based on findings from our 3D printouts.
- We used a 3D printer that printed in nylon as it was the optimum material needed to see how joints rubbed against and fitted with each other.
- We tweak the data based on the 3D printouts and repeat the process a zillion times until we feel the design is optimum.
- The frame is going to be injection molded so we need to prepare the mold data. This process was way more complex than I imagined and involved knowledge of material flow, cooling levels, wrinkling, warpage, mold temperature, injection pressure etc etc - all that and more just to know where to put the pieces in the mold and where to attach the runner gates.
- After a while, we managed to get our own 3D printer which we started to use for production (review here). Just like before, we prepare some STL data of the part to be printed and load it into the printer software called PreForm.
- Preparation of the printer by pouring in the clear resin.
- An ultraviolet laser beams up from inside the printer and hits the bottom of the tank to cure the resin.
- This hand can take between 2 and 6 hours depending on the layer thickness setting.
- The printed parts are then removed from the Build Platform.
- To use this printout for our doll production, I cut off the Support Structures and then sand down the surface to prepare it for the next step which is Casting. My goal is to create a copper mold used for mass production of the soft vinyl shell.
- Photo together with Miyata Noriaki who I designed the frame with.
Soft Vinyl Mold Preparation
Continuing on from the previous section, now we look at how the molds are made for the soft vinyl outer shell.
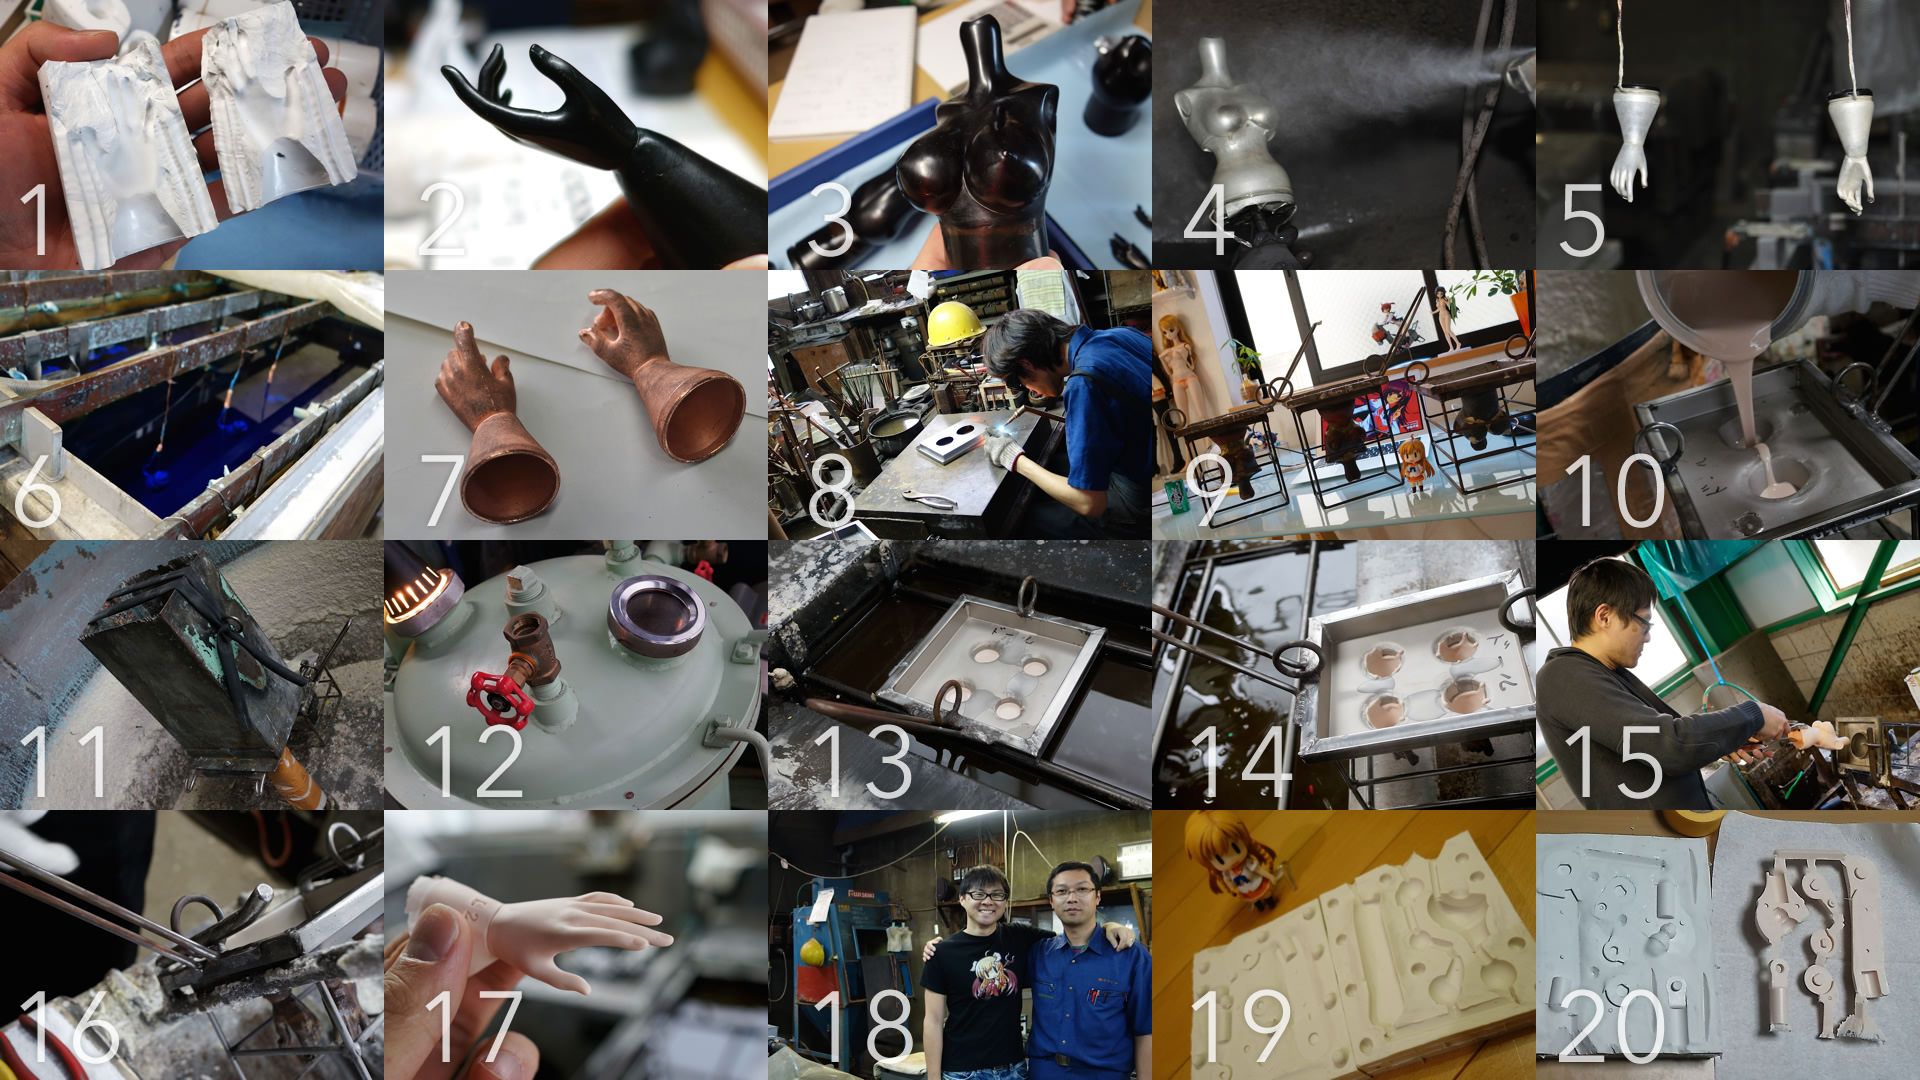
1. Taking the 3D printouts of the body parts in the previous section, the next step is to make silicone molds which we will then use to make wax duplicates of the pieces. We then tie the two pieces of mold back together again and then pour in some hot wax.
2. Once the wax has cured, we can remove it from the silicon mold. Notice the wrist has a funnel attached - this is to enable us to pour in the soft vinyl when this eventually becomes a mold.
3. As soon as the wax copy is taken out of the silicone, the surfaces are rough and need to be polished down - if there are blemishes on the wax then it will end up being in the mold meaning anything made from the mold will also inherit blemishes.
4. Next up is preparing to make the wax copy into a mold and this is done in a process called Electroforming. Each part is first sprayed with graphite-based ink that makes it electrically conductive.
5. Each piece is has copper wire tied to it and hugh up to dry.
6. The wax copy is then dipped into an electrolytic bath. Deposits of copper then build up on the conductive surface to replicate the surface atom by atom.
7. Depending on the size of the wax piece, it can take a week for the copper to build up - this is the end result after the wax inside has been melted and poured away.
8. The copper molds are then welded on to a plate of metal called a "Frypan."
9. We currently only have one set of molds but discovered that we need to increase our mold count as we can't keep up with demands with this single set ><
10. The manufacturing process used to mold the body shell is called "Slush Casting." Here liquid vinyl is poured into one of the molds. The vinyl we use is the same material as other soft vinyl dolls on the market and does not pose any general risk to human health unless you eat or suck it - no sucking!
11. When the liquid vinyl is poured into the copper molds, air pockets get trapped in the liquid which must be removed - we do that by using a centrifugal separator which spins round for 30 seconds or so.
12. Even still, air pockets may be stubborn so they need to be removed using brute force - introducing a deaerator which removes all trace of oxygen from inside the chamber where the mold is placed.
13. The mold is the placed in a bath of oil which has been heated up to about 180 - 190 Celsius. The thickness of the doll piece is determined by how long you leave the mold in the oil. The heat penetrates through the mold and heats up the vinyl closest to the inner wall of the mold.
14. The copper mold is then placed into a cold water bath to cool down.
15. Next we need to pull the part out of the mold - pull to early and the part could end up being stretched - pull too late and it could be too hard to pull out or end up being damaged.
16. The mold has hoops attached - a slight change in the angle of the hoops affects the quality of the pull.
17. And this a hand freshly pulled from the mold - we then need to cut off the flash which is the funnel attached to it.
18. Together with the boss of mold maker Kamijo who have won awards for the quality of their molds.
19. This has nothing to do with soft vinyl but wanted to show you how we made the frame prototypes at one stage - we would use 3D printouts and copy them using silicone molds.
20. Some resin frame parts ready to be cut off the runners.
Continuing from the Design & Mold Preparation section, we are ready to make the molds used for the injection molding for the frame - the most complex thing I've ever worked on ><
Injection Mold Preparation
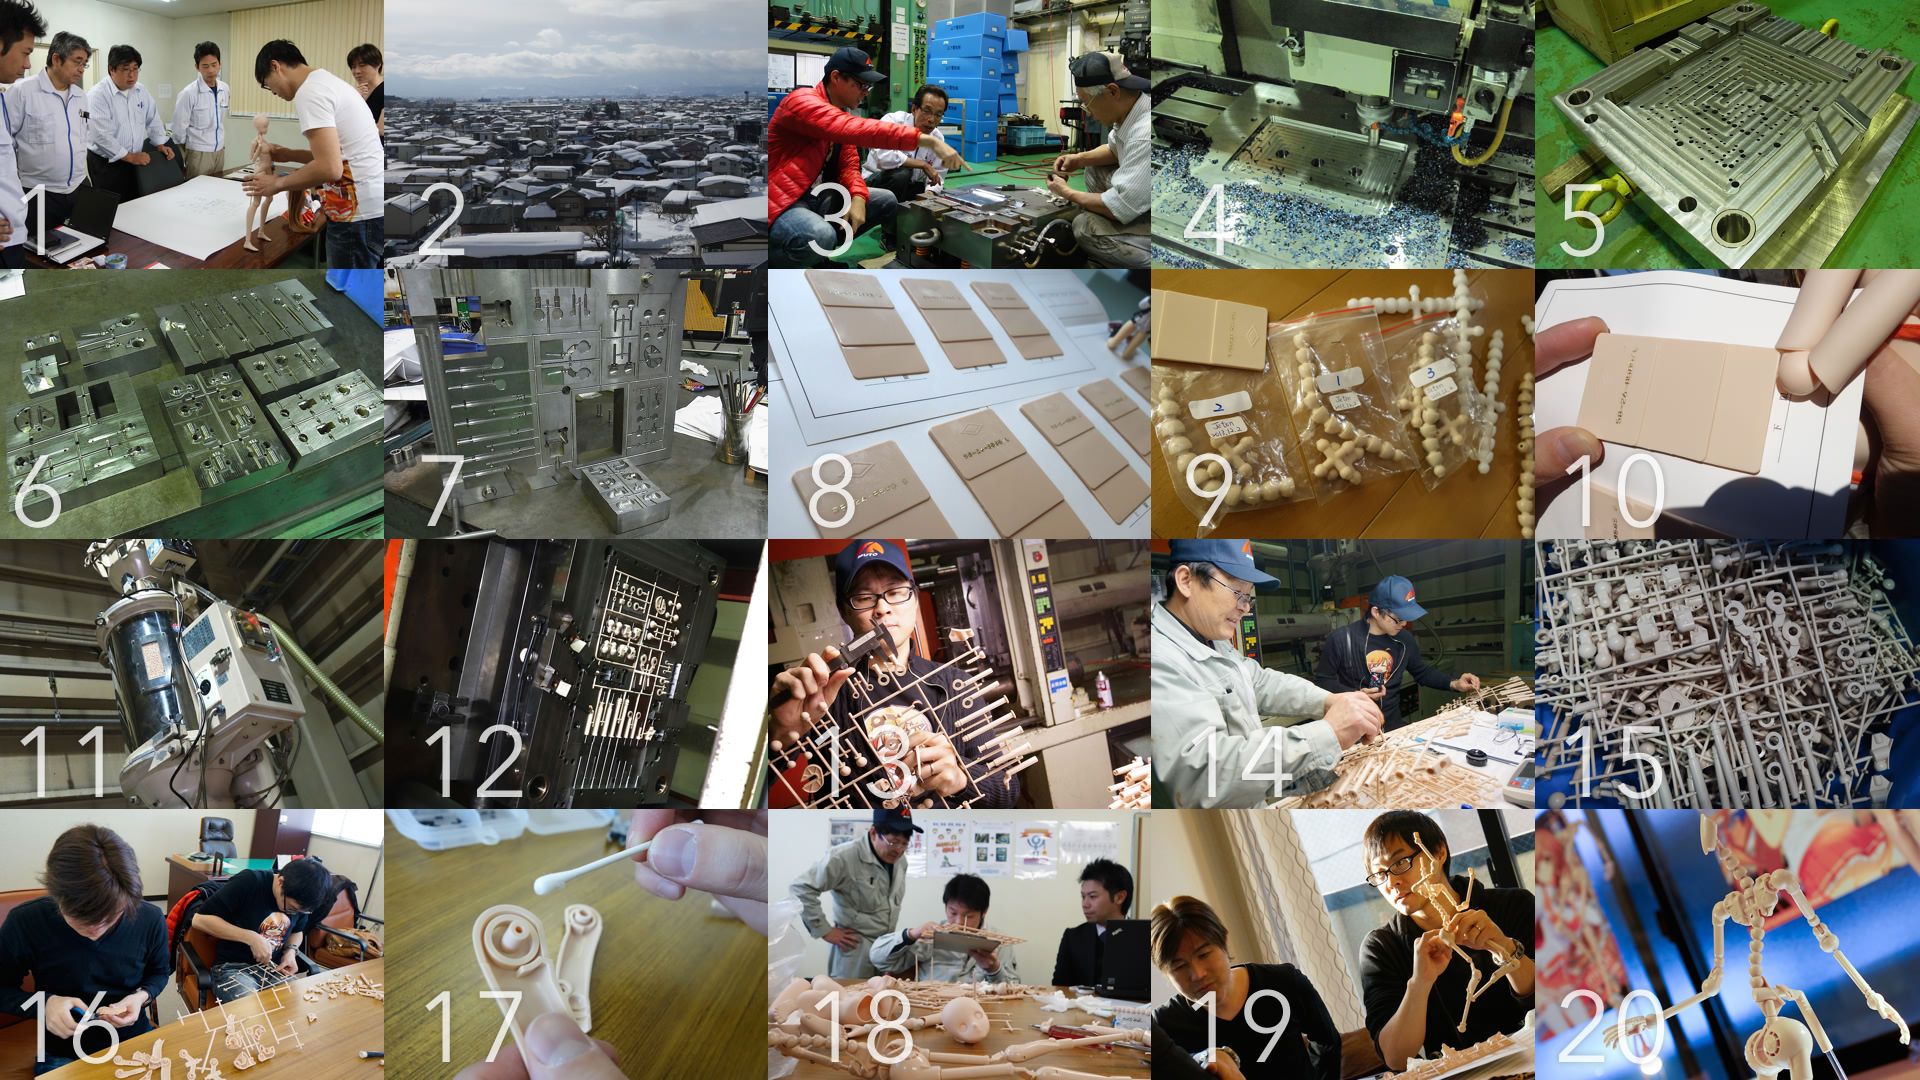
1. I chose to work with a Japanese company called Muto based in Tokyo - this is our first meeting discussing part layouts, issues and wotnot. The process of making an injection mold is complex and we had to modify many parts to avoid warpage, wrinkling etc.
2. Once we are ready to make the molds, I'm off to inspect and oversee the making of the molds at Muto's Shinjo factory in the Yamagata prefecture.
3. Injection molds are huge! They are also expensive too >< Never have I received an invoice for 160,000 USD before ^^; But after making the mold, I understand why it costs so much - you are not just paying for 2 pieces of metal but paying for the knowhow involved into placement of the parts in the mold.
4. Our mold taking shape - the carving process takes a few weeks.
5. The holes you see in the mold are for ejector pins which push the part out of the mold after the molding process. For this reason many products have little circles which are usually placed in not-so-visible areas.
6. We make the mold in pieces so that its easy to change parts in the future. Parts which are tube shaped that contain a shaft need to be put at the side of the mold and are called "Slide" because an extra mold part is slid in from the side.
7. Our injection mold is complete! Now I need to order the pellets.
8. Before ordering the pellets, I need to choose the color. I send off a sample of the outer shell and get back a set of color plates which have been made especially to match my requirements.
9. For the spine, I use a product called JETON which is a joint that already exists on the market and are used as a frame for dolls and plushies. I use those color plates to order some JETON joints in the same color.
10. Color matching is a difficult process as colors looks different in varying lighting conditions.
11. My pellets have come back from mixing and have been placed in the injection molding machine. Here they are heated to high temperatures and injected into the mold which has also been heated up to receive the material.
12. Once the material has been injected into the mold, the mold opens up and the parts are pushed out by the ejector pins.
13. The size of each part on the runner changes depending on the values used during the injection molding process which include things like temperature, pressure, speed and so on.
14. So even though we have the mold made to spec, we then need to tweak values over the next few months to make sure that all frame parts fit together nicely.
15. We do thousands of tests which unfortunately does involve wastage but is all part of the process of making all the parts fit perfectly. All test parts are recycled according to Japanese rules and regulations.
16. To see if the parts fit together properly, we need to assemble several hundred frames over a period of a few months.
17. We use grease on all joints to ensure smooth but rigid movement. Initially from time to time the grease may seep out to the surface of the wrist, ankle or elbow joint - if that happens then just blob it with some tissue.
18. Its not just the assembly of the frame we need to do - we also need to put the frame in the outer shell to see if everything fits together properly. Through this process we had to change a few of the outer shell molds.
19. The very first frame batch to come out of the mold is known as T1. Everytime we make a change to the frame we increment that number. We finalized the frame at T7.
20. Mirai Frame is made from POM (Polyoxymethylene) which is recognized for its high strength, hardness and rigidity.
I do plan to sell the frame standalone which is why I designed some hands and a head for it - the hands and head only come with the standalone frame.
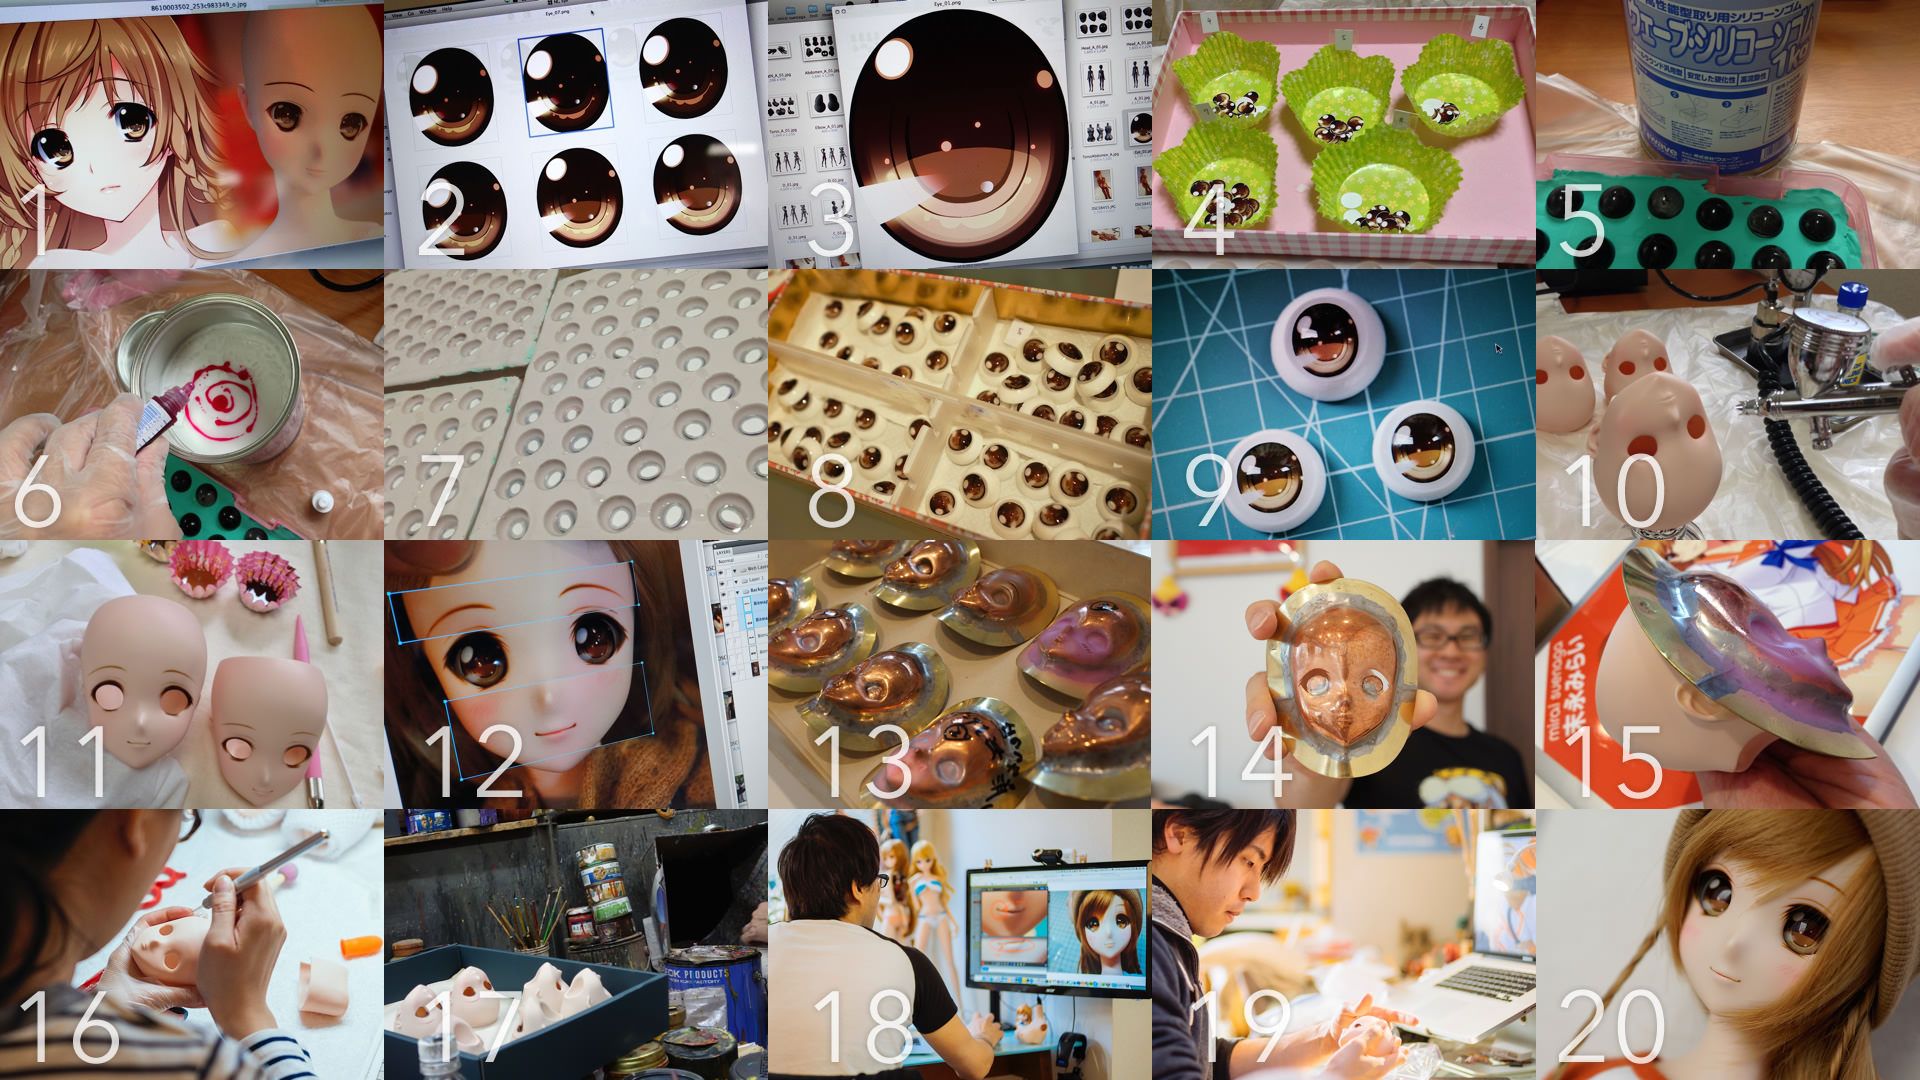
Face & Eye Development
A large proportion of the entire production process is spent on making sure the face looks cute!
1. The face design is based on an illustration of Mirai Suenaga by Japanese illustrator Iizuki Tasuku-sensei.
2. The most important part of the face are the eyes so I wanted them to be something really special. Slight changes in gradient, highlight position and color give a totally different look and feel.
3. The eye design is made in Photoshop.
4. Its important to see how the different variations look so we print all the pupils out on photographic paper and cut each pupil out.
5. A mold needs to be prepared and we do that using silicone.
6. A hardening agent being poured into the silicone.
7. Clear resin is poured into the silicone mold and the pupils are placed on the resin face down. We then pour in white resin to finish off the process.
8. We repeatedly make prototypes until I'm happy with the look and feel.
9. A slight change in color of the eyes affect the entire look and feel of the face.
10. Now we take a look at how the faces are painted. Initially we make a master prototype - for this I call on the talents of Ronronshuka-san.
11. I have several faces painted in slightly different variations and choose one to modify.
13. Once I have a head that I am completely happy with, we need to make paint masks. This is done using a process called electroplating where the head is plated with copper to form a mask - the mask is then etched with the same design as the face.
14. The number of face masks depends on the number of colors needed.
15. The mask is placed on the head like so and sprayed. The mask means that we can paint the faces quicker but is still a very manual job and not printed by machines like figures.
16. Before we send off the heads to be painted, we need to cut out the eye holes and the flash from the top of the head. The eye holes then need to be sanded down on the inside to make sure they conform to the contour of the eyes.
17. Some of the Mirai heads in the process of being spray painted. We actually also paint the inside of the eye sockets too. This is all done in the Katsushika ward in Tokyo.
18. When the painted heads come back, I need to scrutinize and check them. If paintwork is slightly off then I will send them back where they will be wiped down with thinner and painted again. I do keep some for production or display purposes though.
19. The eyes need to be placed into the head and we do that by using a load of Blu-tac. We use Blu-tac which makes it easy for you to change the eyes - we will be releasing our own brand of doll eyes in the future. You can also use third party eyes too and should choose ones which are 22mm wide. At this stage we also put in the magnet used to hold Mirai's hair clip in place.
The eyes are placed in a way so that they ever so slightly look inwards as I think she looks cuter that way ^^; If you don't like cross eye girls then you can always adjust the eyes yourself though.
20. Face complete and I think she looks really cute!
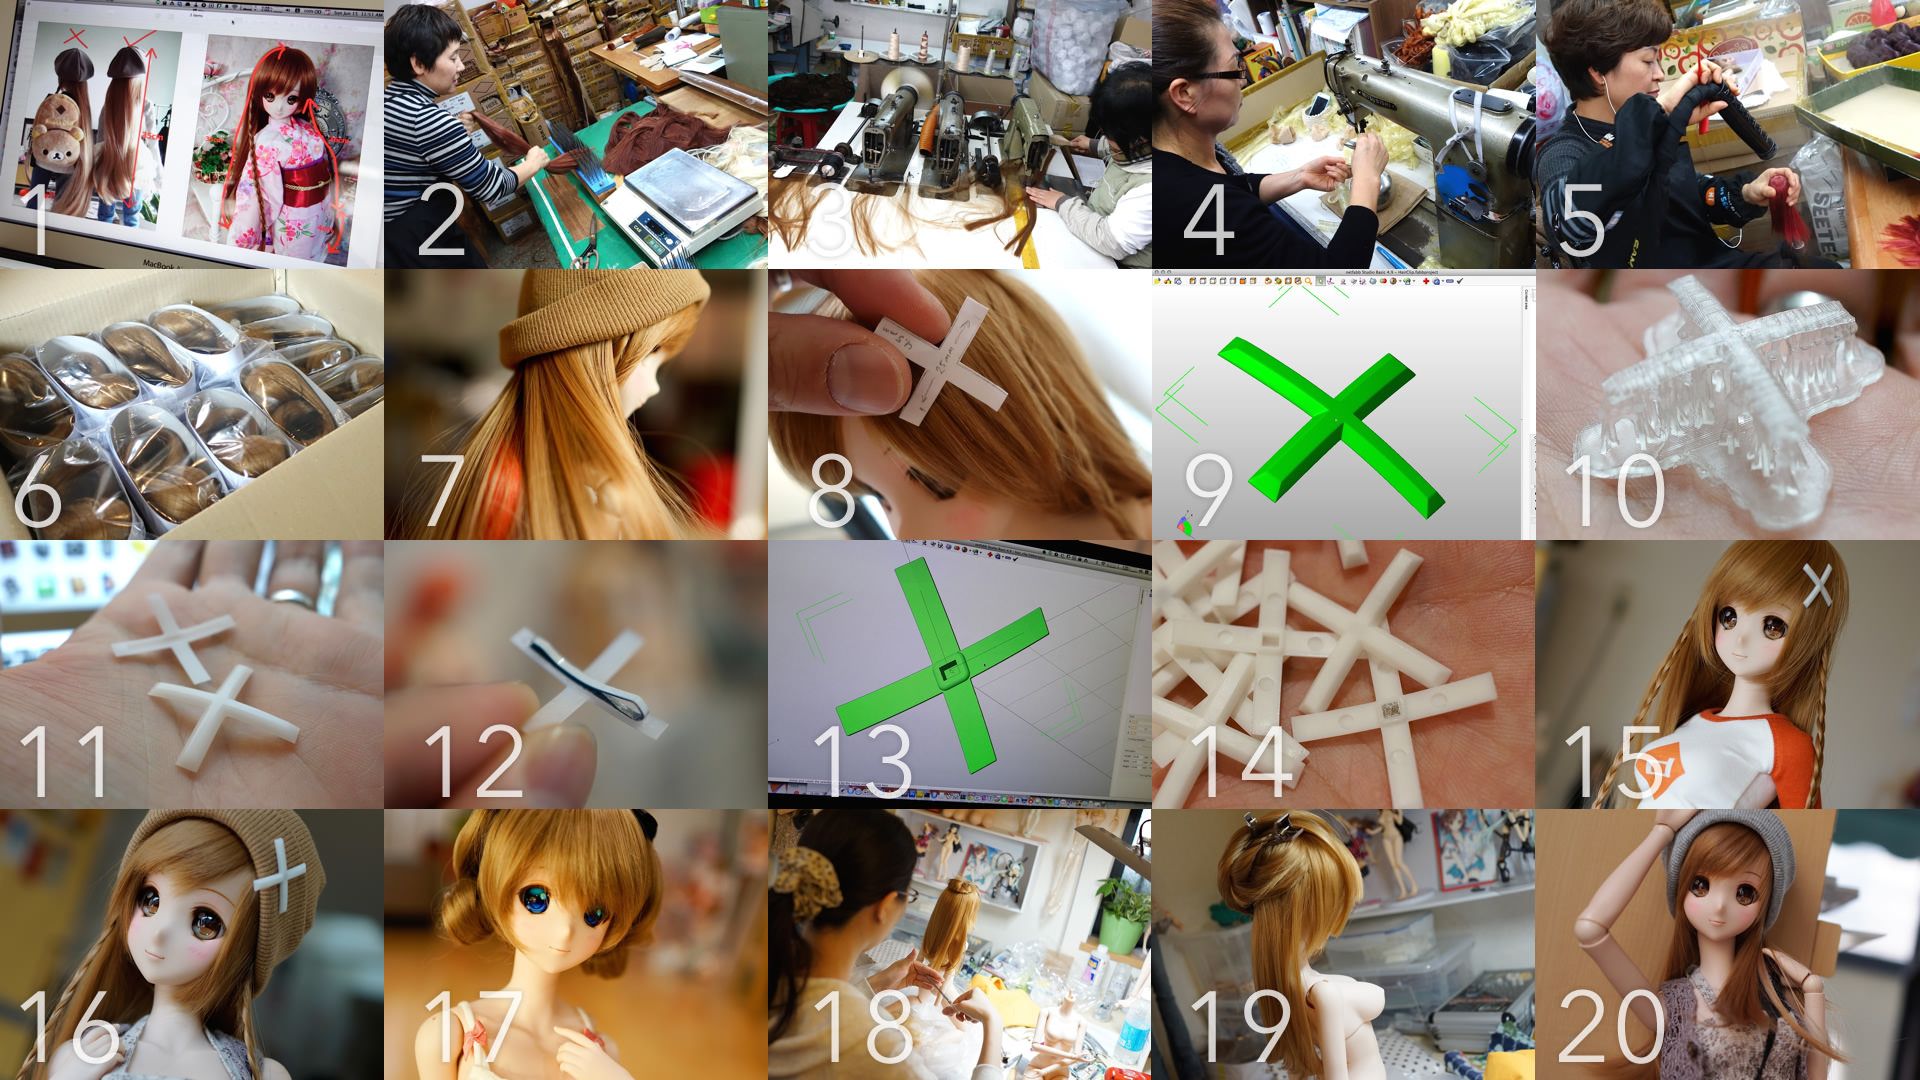
Wig & Hairclip Development
Being a fashion doll, Mirai comes with a removable wig so that you can use our brand of wigs (which we are developing now) or third party wigs. Mirai has a small head so the wig circumference you should be looking for is 21cm.
1. To mass produce wigs I first need a prototype - I find a third party wig which is styled to my liking - I then take photos of it and use the usual monosnapping to provide instructions to the vendor who makes the wigs.
2. Korea has a large established resin doll industry with many vendors that create high quality wigs and apparel. I learned Korean together with Japanese when I was at university but never thought that being able to speak Korean would become such an essential part of our business ^^
Anyway, here are some synthetic fibers being prepared for stitching.
3. The synthetic fiber is then stitched on a thin ribbon.
4. The ribbons are then stitched to a head cap.
5. Once the headcap is ready, all the synthetic fibers are standing up which makes our Mirai-chan look like a mad woman - the hair is styled using hot steam which shoots out from this black tube. Once thats done, Mirai has her braids hand pleated.
6. Once a sample is ready, I would provide feedback on what I want to change - this process is repeated about 5 times until I'm happy ^^;
7. I chose to use heat resistant synthetic fibers which means you can even style her hair using one of those hot iron hair curlers.
8. Next up is the development of the hairclip. I left this until the last because I could not think if a good idea to affix the clip to Mirai's head without ruffling the hair too much.
9. Once I have decided on a size for the clip, I make it in 3D software.
10. I then print a version using our 3D printer to check the size.
11. The size was fine so the next step is to make the hair clip in the same material as the final product. I do this by sending data off to Protomold.
12. I initially thought I could attach a clip like this but it was a pain fixing it to the side of the head and there was a risk of scratching the side of the face.
13. We came up with the idea of using strong magnets instead so we modified the data and used Protomold again to do the mass production.
14. And here is the final product with magnet fixed in place.
15. Mirai-chan and her iconic hair clip - it can fall off easily so I would advise that you remove the clip when you are out n about and attach it just before you take photos.
16. The magnet is strong enough for you to attach the clip to the side of the head through her beanie.
17. The removable wig means that you get to customize and make your very own Mirai ^^
18. At the moment we are developing a wide range of wigs.
19. The new brand of wigs will be called "Wiggly Wigs."
20. I was joking about the "Wiggly Wig" naming. This is Mirai with shoulder length hair which I really like!
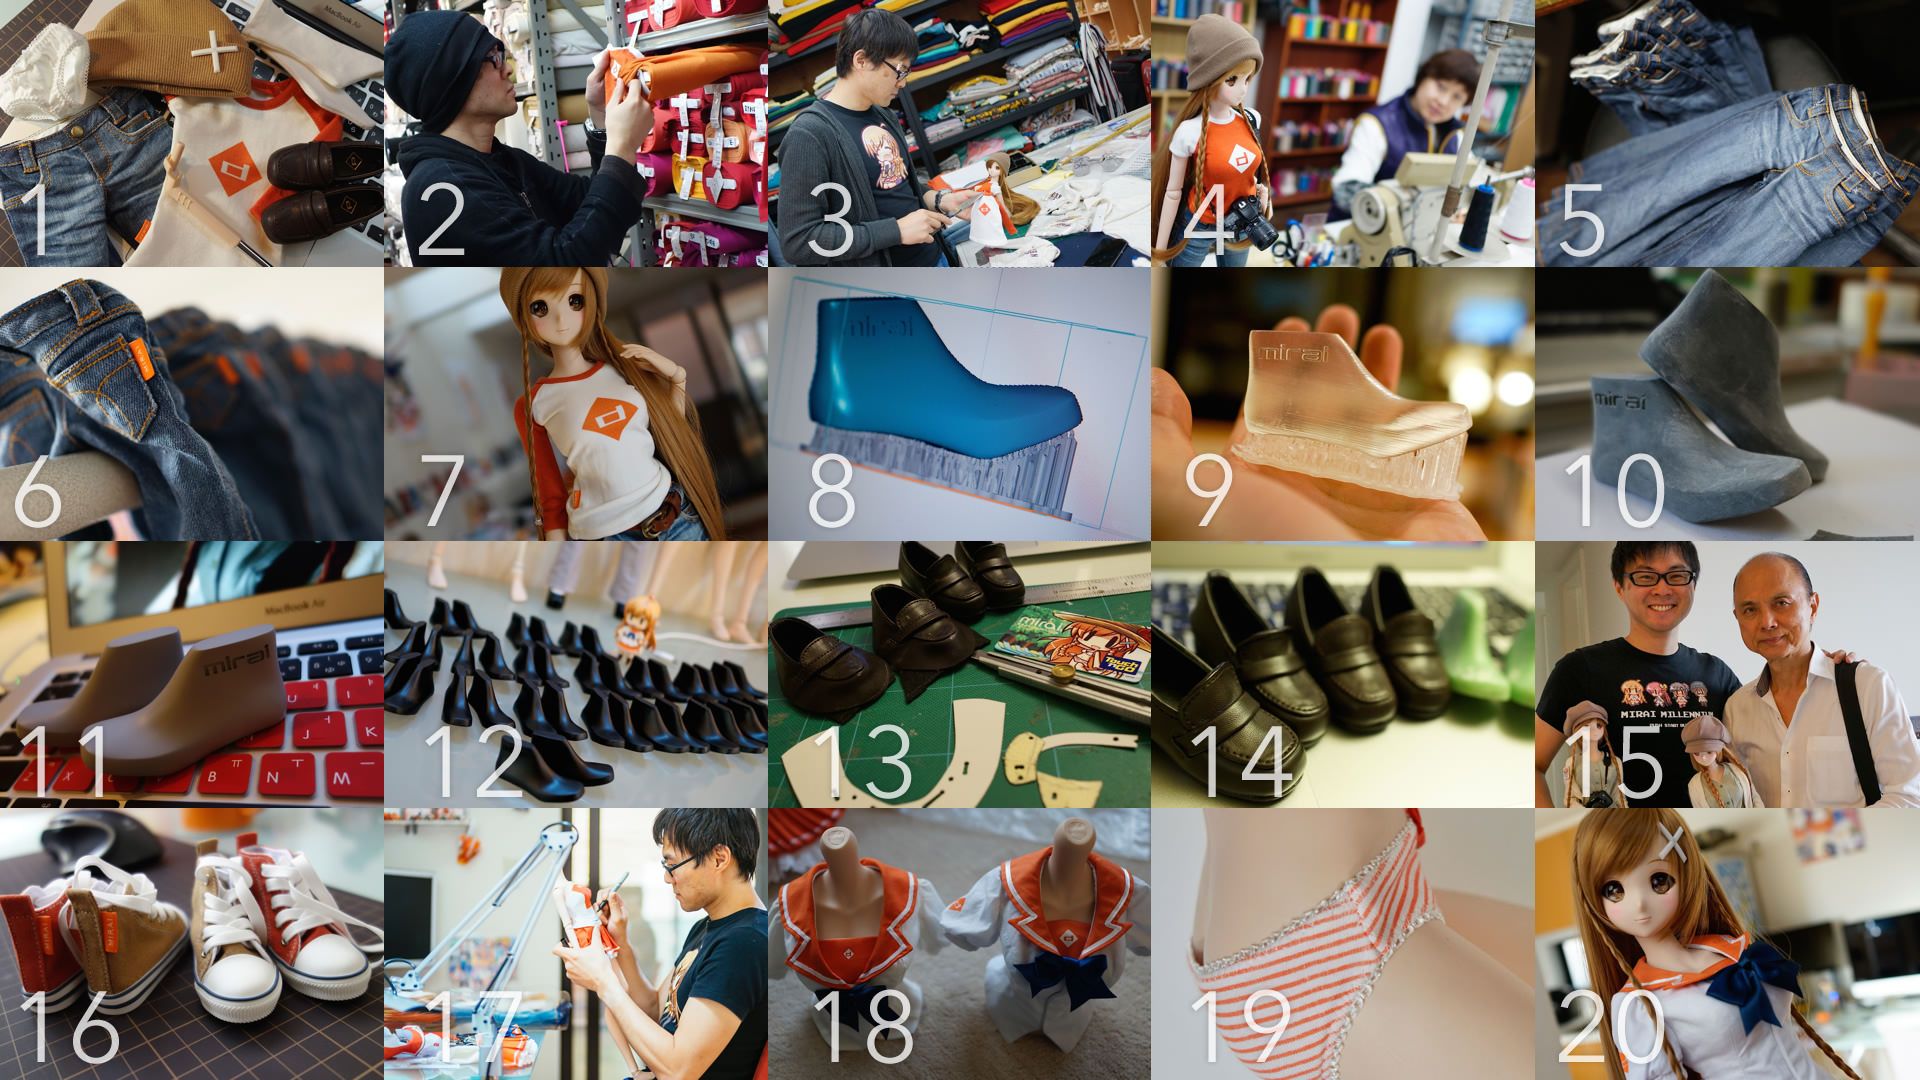
Apparel & Shoe Development
All apparel items are designed by myself with the aid of some talented doll seamstresses - in particular Puppy Dolls and Murasaki.me who are both official Smart Doll Tailors. If you need anything original made for your Smart Doll then contact either or both!
1. This is the set of casual clothes that Mirai comes with - this is a photo of the actual product and not of prototypes.
2. The most challenging thing about making the apparel items was color and material - one of the reasons is because they are not always available and come and go with seasons. Here I am hunting for material at Tomato in Tokyo.
3. Working on T-shirt tweaks. The T-shirt was designed together with Murasaki.me who also sells the same design for various dolls.
4. Mirai-chan came with me to Seoul to oversee some of the production.
5. I think you are really going to like the jeans - I designed them to be bell bottomed and they make Mirai look great! PuppyDolls helped out with the prototypes.
6. The jeans are given a worn look and feel - here they are being hung up to dry after bleaching.
7. Mirai ready to head out in her casual gear! Ah - the belt in that photo is not included ^^ I thought a belt would look nice but it makes the T-shirt look short compared to the length of the legs so I removed it.
8. For the development of the shoes we also use the aid of 3D prototyping technologies. To make shoes we need a "Last" which is the mold in the shape of a foot - we make this in 3D software.
9. The Last printed on our 3D printer.
10. The Lasts sanded down after a lick of primer.
11. Here are the final Lasts ready to be duplicated - for this we use the services of RC Berg.
12. RC Berg take my original prototype and duplicate it in silicone - this enables us to make loads of shoes - at the moment our capacity is 400 pairs a month but are in the process of ramping up.
13. Our shoes are made using the same processes as making human shoes - I'm extremely pleased with the quality.
14. I manage production of the shoes in Malaysia at studios of my fathers comrades.
15. For folks who are not familiar, my father makes shoes and goes about by the name of Datuk Jimmy Choo. When I was younger I also made shoes in his studio for folks like the late Lady Diana.
While we didn't end up working together on human sized shoes - we did eventually but on smaller sized shoes - for dolls ^^
16. I'm also working on a new brand of shoes for dolls - here are samples and a taster of what's to come.
17. I really need to hire somebody full time to manage all the apparel design and production but for the meantime I'm doing everything myself. Here I'm working on the Summer Uniform which has been a challenge as its based on the design of an illustration that has Anime physics ^^;
18. Some samples of the Summer Uniform.
19. The orange shimapan underwear that comes with the Summer Uniform.
19. The orange shimapan underwear that comes with the Summer Uniform.
20. Mirai with her Summer Uniform - the bust attached here is Large but I will be first releasing the uniform for the Small bust.
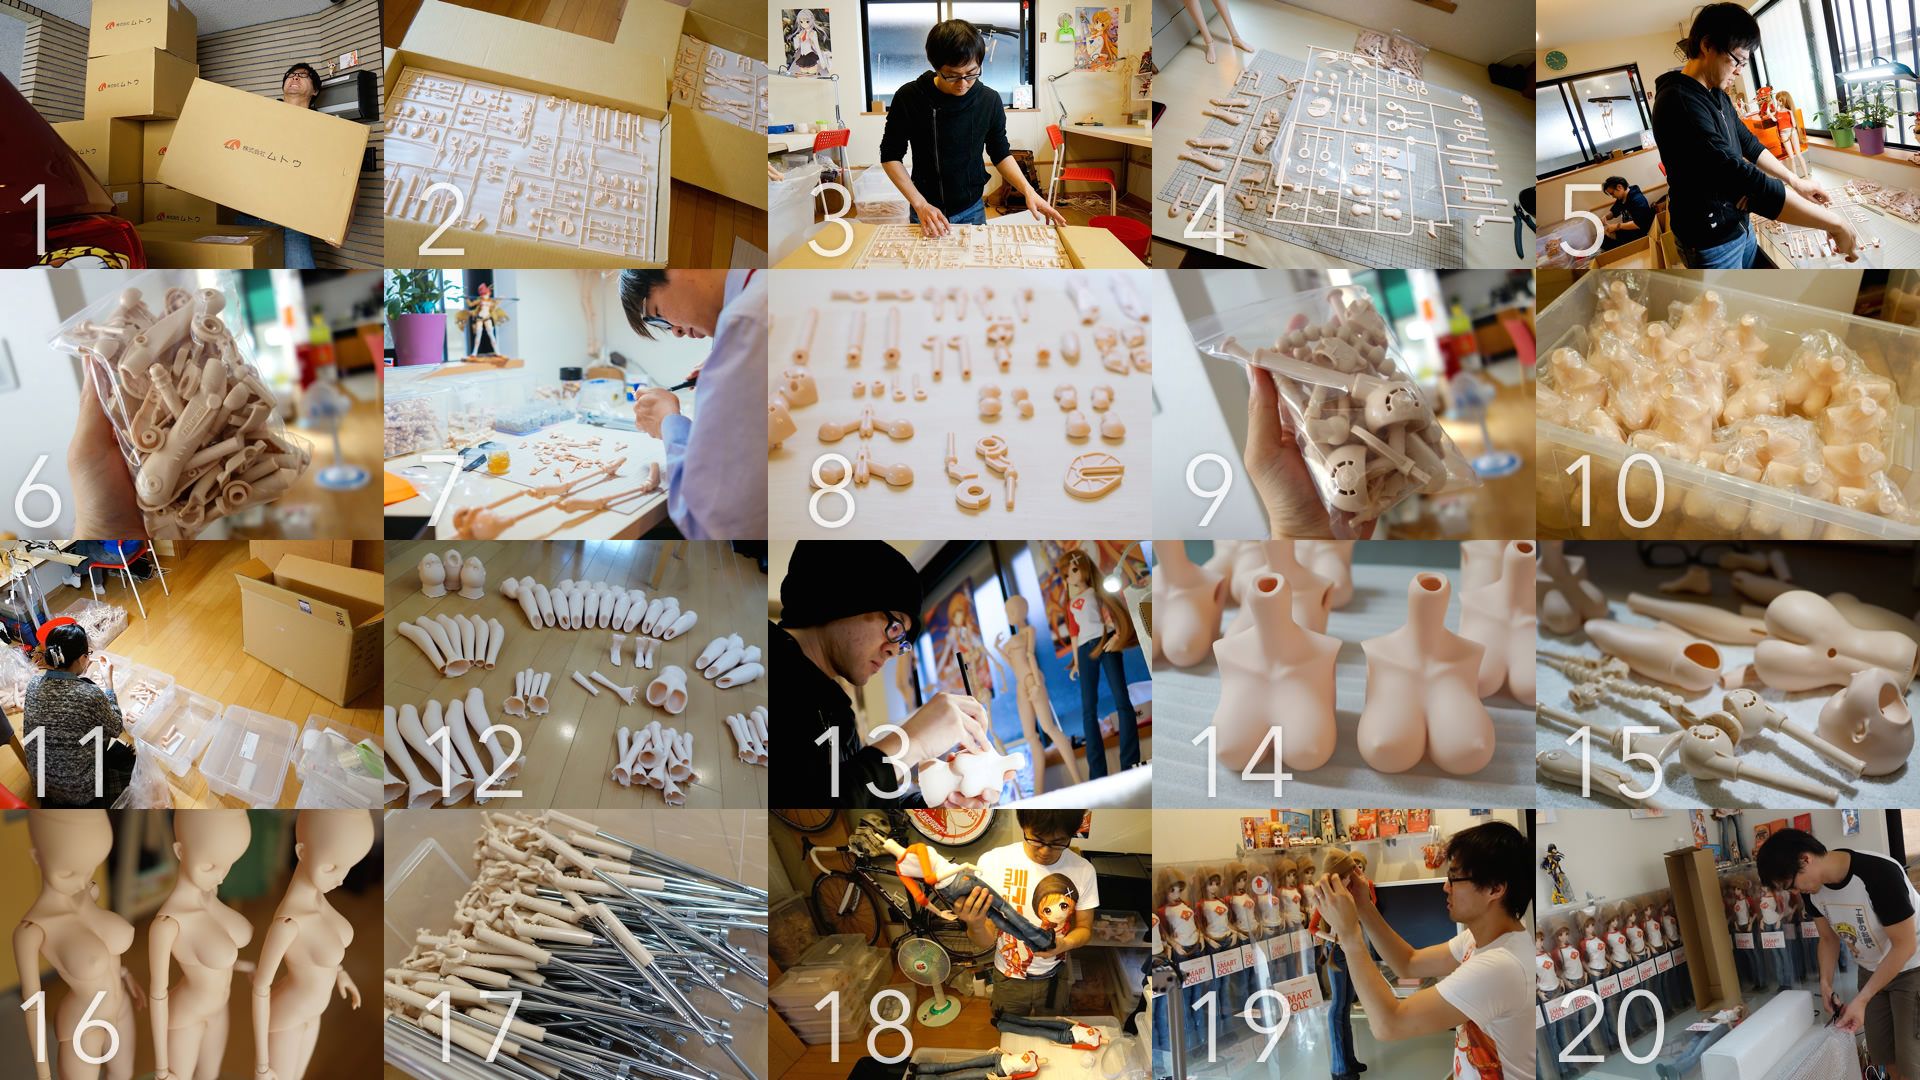
Assembly and Shipping
And there is more ^^;
1. All assembly and shipping is done at my house and when the injection molded frames arrive they do so in huge boxes that take up the whole of the first floor ><
2. This is what it looks like inside the box - 1 frame is made up of two sets of runners.
3. Each set of frames need to be inspected for blemishes.
4. The boxes take up way too much space so we need to reduce their mass by bagging all the frame parts in separate bags. We do this using trays from IKEA that we call Sorting Trays.
5. We break the pieces into the tray by hand and cut off the gates during assembly.
6. Once the frame parts are bagged they take up much less space and the production line has become a wee bit more efficient.
7. Next up is assembly of the frame - folks who build Gundam may like this task. The frame does use screws for extra strength around the large joints but most of it is snap fit.
The assembly process involves greasing various parts, snipping the gates and in cases sanding down gate marks too.
8. Here you can see that some of the parts are shiny and others are not - I got the injection mold sand blasted for areas that I wanted to be matte which are the wrist, elbow and ankle joints - the reason is so that they can match the soft vinyl shell as much as possible which is also matte.
9. And once the frame is assembled we stick it back in the same bag.
10. Now we look at preparation of the soft vinyl - here are some parts back from the factory in Katsushika Ward.
11. The first thing we need to do is to check the parts. I mentioned air pockets in one of the sections above - I reject parts which have large air pockets but approve parts which may have extremely small ones in areas which are not so noticeable - but this is rare and may be a single air pocket 0.02mm wide at the back of the bust for example - folks who prefer a spic n span surface should avoid purchasing Smart Doll.
I also reject parts which have wrinkles or large black dots - but approve the dots when they look like small beauty marks as I think they are kinda cute and we humans have them anyway - folks who prefer a spic n span surface should avoid purchasing Smart Doll.
I generally don't approve those black dots when they look like a spec of dust. The black dots look like beauty spots when they are just under the surface of the material.
The black dots are still a mystery to folks in the industry who do slush casting but I think that its god doing his work to beautify your Mirai ^^; Heck there are even folks who purposely add beauty spots to their body.
12. Here are some parts which have been rejected for some reason or another. When this happens we need to get these parts made again and repeat the process. While this process is important - it's also particularly time consuming.
13. Once we have a set of clean parts, we need to cut off the flash - this is done by heating up the soft vinyl parts in a heat box and then using a craft knife to do the cutting by hand. It may look easy but I want the edges to look like they have been cut by a machine and so far there is only me and another member of staff that can do this.
The difficult thing is that there is no cutting mat to rest the part on - you have to cut in mid air.
If you think you can cut like a machine then I am interested in hiring you full time!
If you think you can cut like a machine then I am interested in hiring you full time!
14. Here are some freshly cut busts - the Medium Bust on the left and large Bust on the right - the Large Bust has more volume on the sides.
15. Next we need to put the frame inside the soft vinyl body parts. This is done by heating up the soft vinyl parts again in the heat box. The final step is to snap in the cover of the Smart Support Socket located at the back of the torso.
16. Here are some completed Smart Bodies.
17. The telescopic stand has to also be assembled and we do this by using our magic friend Blu-tac. I used Blu-tac because some folks may want to customize the stand plug and it didn't make sense to glue it tight.
18. The next thing to do is to dress the dolls. The jeans are a bit of a tight fit because I really wanted to show off her bodyline. The shoes are a bit tight too because I didn't want them to fall off when you carried her around.
19. Nearly there! Next the boxes have to be assembled and the various postcards put inside the white envelope which also acts as the box logo. The design of the box will probably change over time.
20. Final step is packing and shipping out by EMS. As our own E-commerce platform is not ready yet, manual processing paypal orders at the moment is currently a bottleneck that we need to improve.
Packaging may be different from the ones of her you see in the clear box which was originally designed to be displayed at stores. We are constantly improving the package and packing methods based on customer feedback - we need to also do this in a way so that it does not increase weight for shipping.

There is a load of other stuff that I haven't mentioned that goes into the production of Smart Doll - managing schedules of vendors, management of staff and part timers, optimisation of workflow and storage, temperature control, ordering and keeping track of all the small stuff needed like bubble wrap, boxes, stickers, tapes, blades, ribbons, plastic bags, surgical gloves and so on and so on. Then there is all the finances that need to be kept track of too.
Anyway, as you can see quite a bit of work is involved in bringing you Mirai. As we have just started, our costs are extremely high which is why our unit costs are high too but as we improve our workflow and constantly seek ways to reduce costs, I will be able to pass those savings back onto the customer.
This photo taken on my 105th visit to Ikea Kouhoku branch to pick up more containers to store stuff - then I need to optimize space in our house to store them ><