Caring for your Smart Doll

Owner Registration
If you did not order Smart Doll from the Culture Japan Online Store then you could have got one from one of our retailers, events or even walked into our store in Tokyo but forgot to leave your email address.
I want to make sure to keep in touch with all Smart Doll owners with new developments, products and accessories so if you want to keep in touch too then just fill in this form.
Caring for your Smart Doll
This section is for Smart Doll owners but folks who are considering buying one will find useful info here to make a decision to buy or not.
But first thing's first! the unboxing video below should be watched by all Smart Doll owners now.
But first thing's first! the unboxing video below should be watched by all Smart Doll owners now.
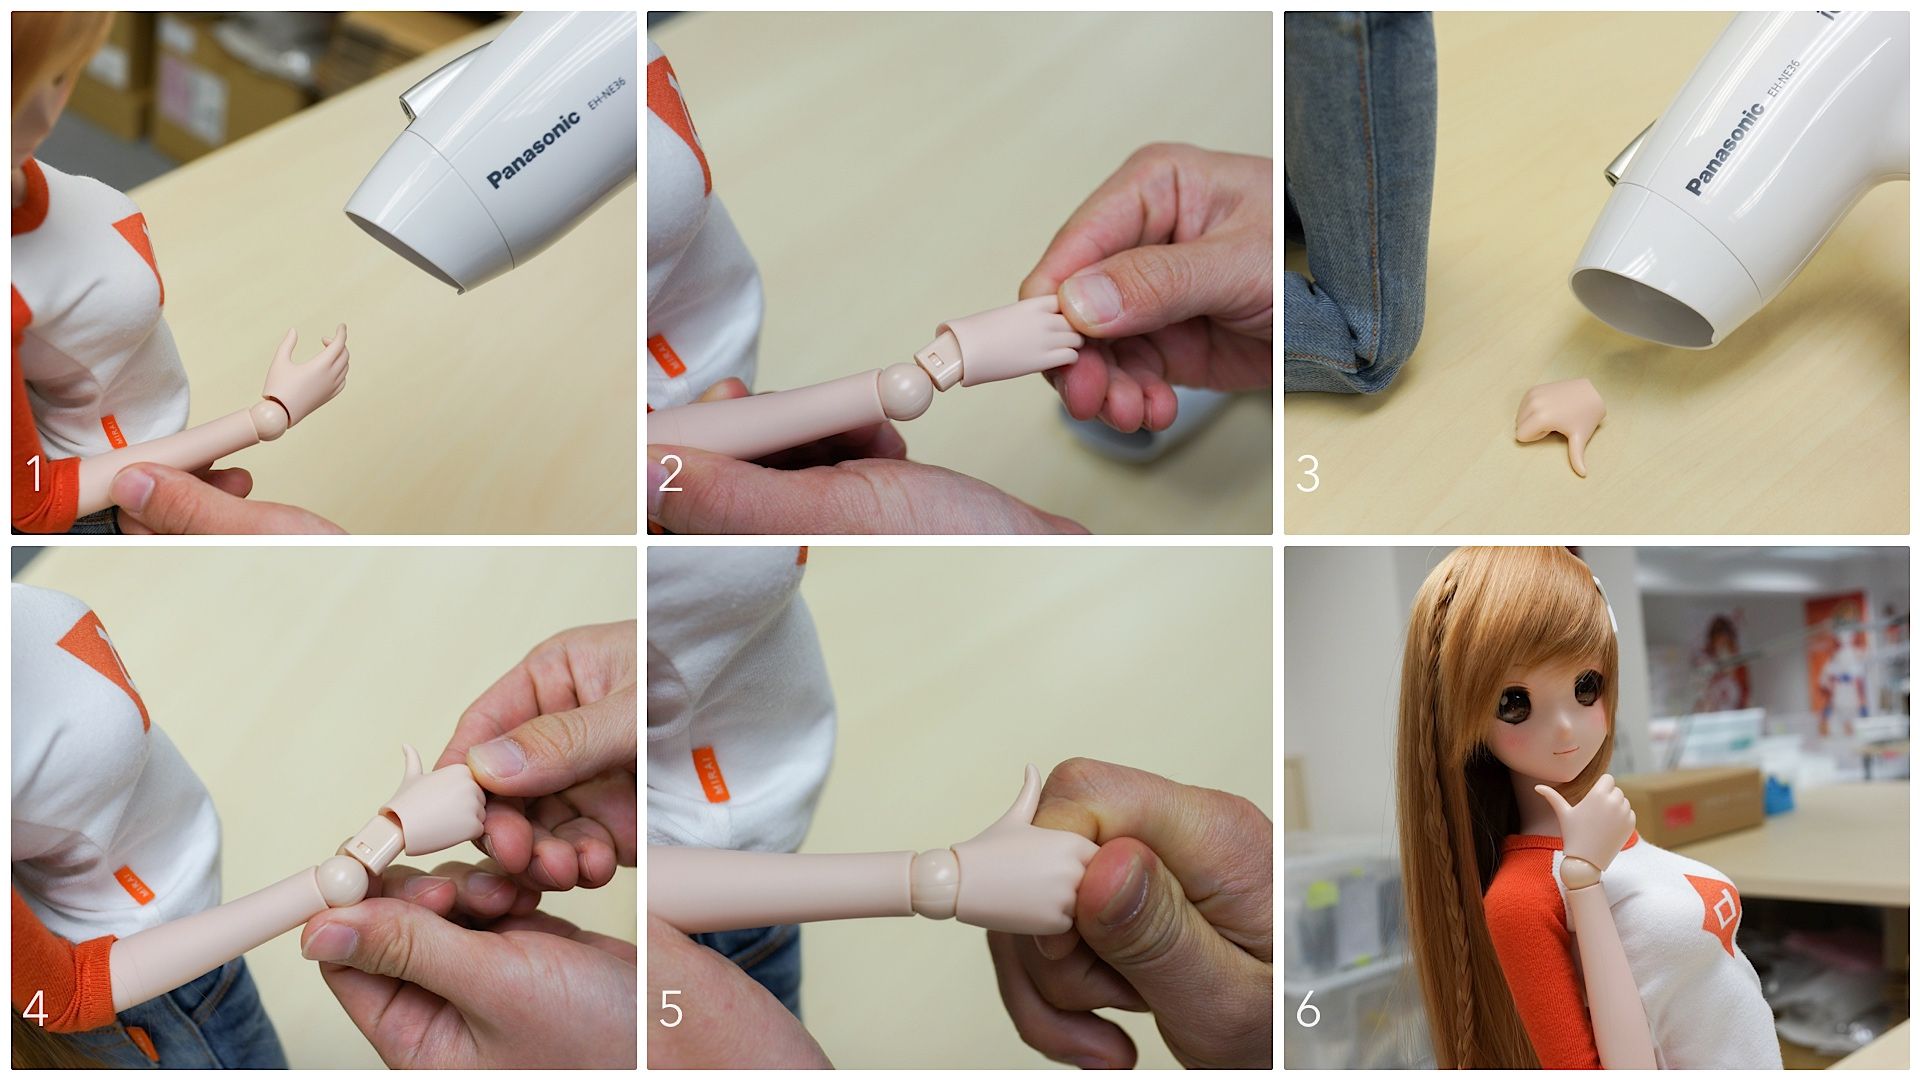
If you purchased the extra hand parts - do note that you may need to use a hairdryer to heat the hands (both attached and the ones to be attached) before replacing them.
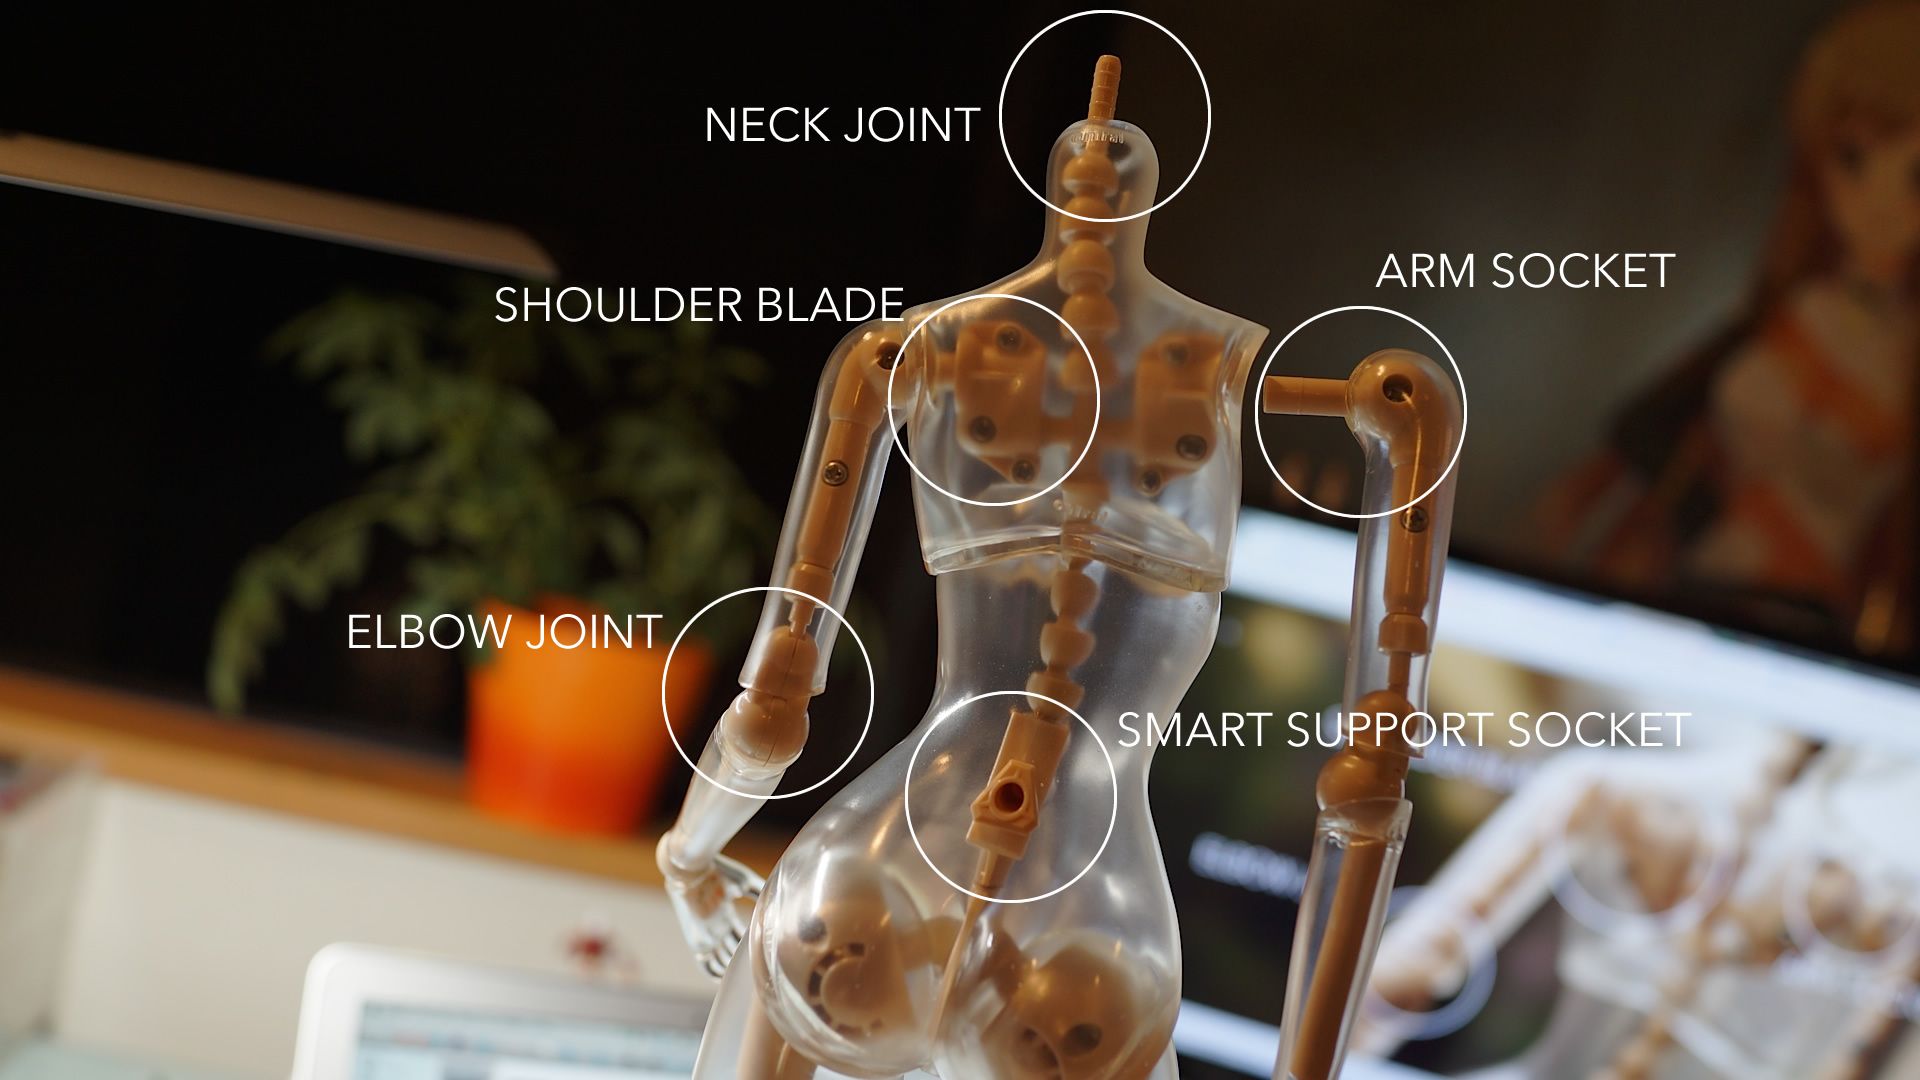
Inside the Smart Doll
I made a clear vinyl version of Smart Doll so that you can see what it looks like on the inside.
When you pose the arms, the shoulder blades may start to tilt forward - always make sure they are in an upright position or your Smart Doll may start to slouch - the head may also become loose too.
When you pose the arms, the shoulder blades may start to tilt forward - always make sure they are in an upright position or your Smart Doll may start to slouch - the head may also become loose too.
Unpacking and getting your Smart Doll dressed
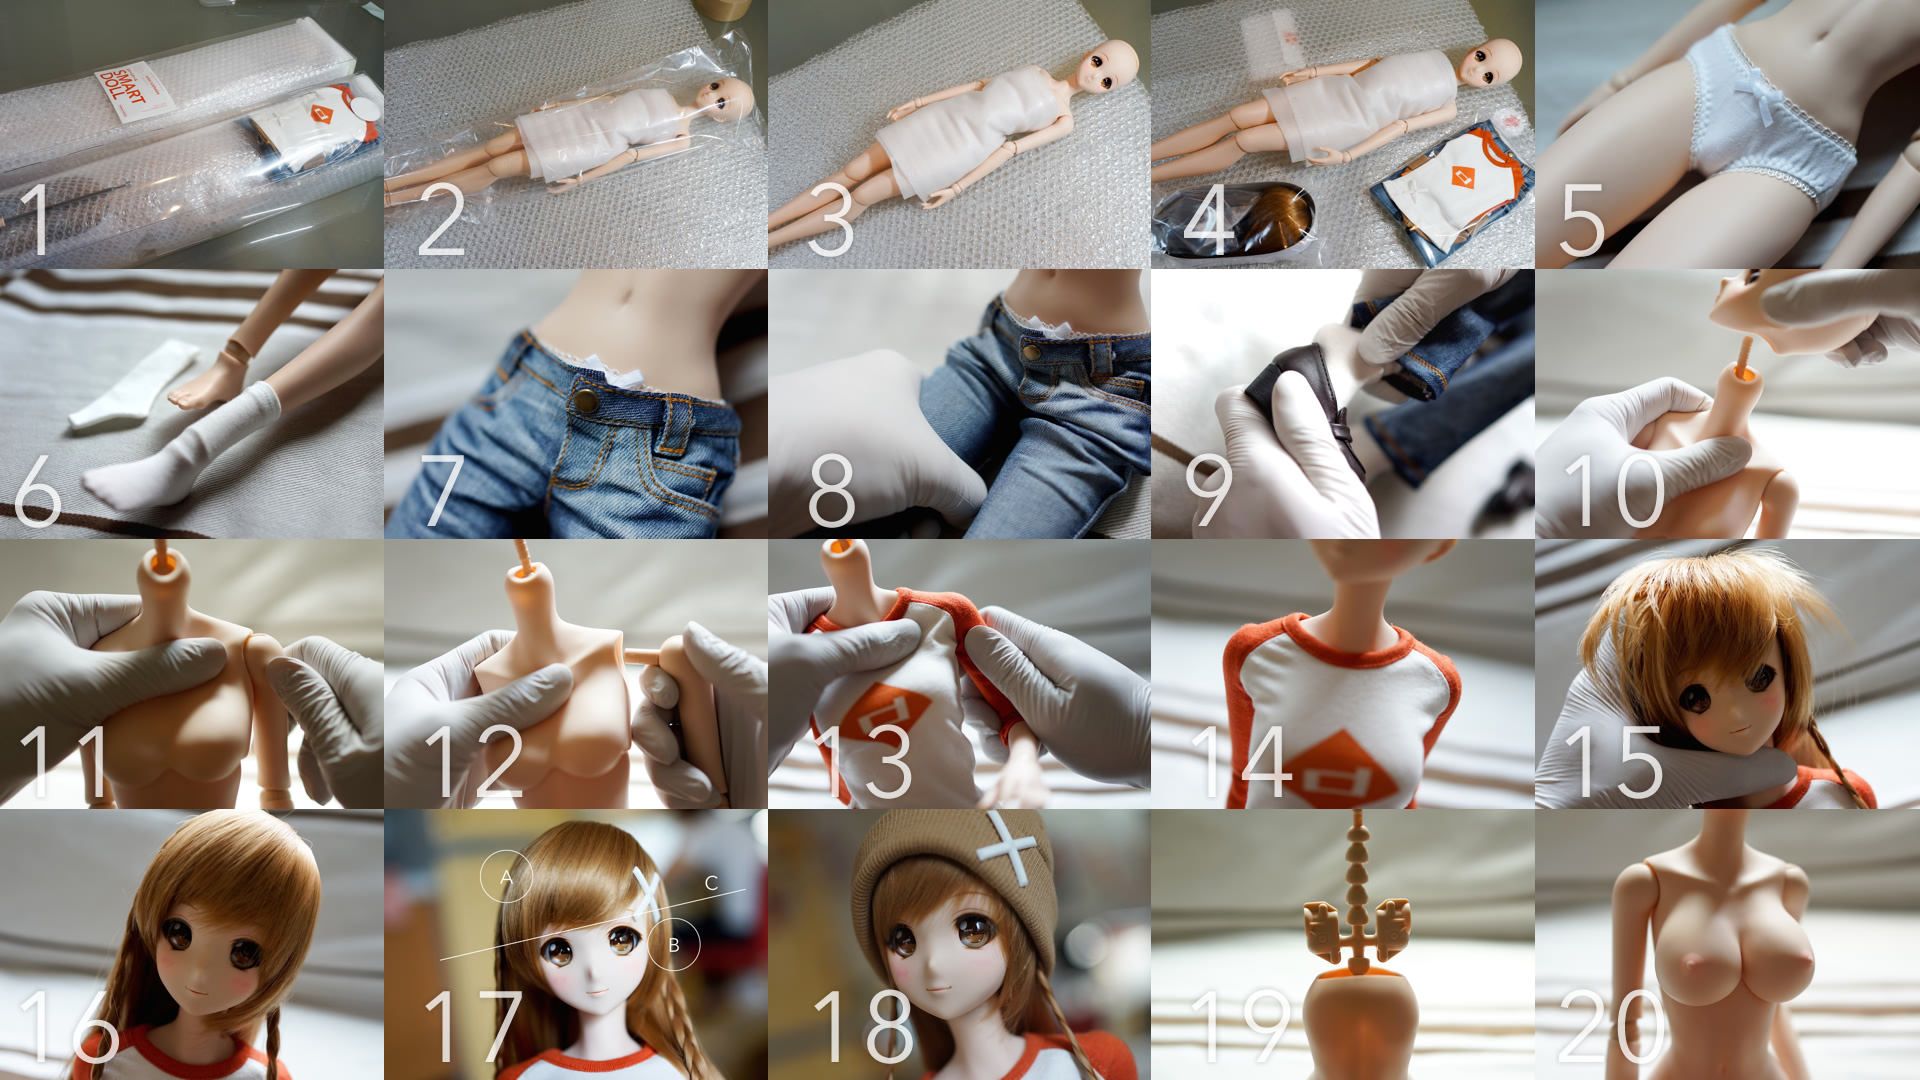
1. This image is showing the old packaging - ignore it until I find time to update it ><
Check out this post to see the new packaging.
Check out this post to see the new packaging.
2. Mirai will be in a plastic bag - remove it. I cut the corner off the bag so that she can breathe.
3. Mirai's body will be wrapped in soft sponge to prevent her hands scratching her sides - remove it.
4. You will find 2 bags of stuff inside the box - wig + shoes & jeans + T-shirt + underwear + socks + hair clip. The hair clip can fall off easily when in transit so make sure to put it away when not in use!
5. Put on Mirai's underwear first.
6. Next the socks - the socks are a bit of a tight fit so put the on slowly. I hate socks that fall down easily which is why they are tight.
7. Next put on the jeans - these are a tight fit too as I wanted them to show off Mirai's body line ^^; Make sure the underwear is pulled up so that the button of the jeans does not touch the skin or it could leave a mark - but that can usually be removed with a bit of heat from a hairdryer.
8. If you want Mirai to sit down, you will probably have to roll her jeans up a bit as they are a tight fit - do so by grabbing the thigh and twisting the jeans back and forth towards the crotch. There is a slight risk of color staining on the thigh when she is sitting down for prolonged periods due to the pressure between the thighs and crotch. My Mirai stained a bit but easily came off with a few rubs of the thumb.
9. Next is the shoes - the shoes are a tight fit too as shoes with my previous dolls fell off easily and I didn't want that to happen to Mirai. Hold the ankle firmly and put on the shoes like so.
10. Next up is the T-shirt and to put that on you need to remove the head - do so by grasping the head like so and twist back n forth away from the body.
11. Next you can either remove the arms or just the hands to put the T-shirt on. To remove the arms, hold the shoulder in one hand and the bust in the other like so.
12. Pull the arm and it should pop off.
13. Now you can put on the T-shirt and then put the arms back in place through the sleeves - the arms should "click" back into the shoulder slot. Always make sure the shoulder blades are upright or it will look like Mirai is sloughing and slouching is not good!
14. Replace the head but make sure not to push the head down too far as her neck will get squashed and look really thin!
15. Now for the wig - remove the netting the wig came in and place on the head. The wig is slightly loose to enable you to change or remove it during transport - I personally keep Mirai's wig attached and fix it down with a bit of blu-tac in the wig cap.
As the wig is new - it will look flat so just press the top of the head and Mirai goes into "mad woman" mode - this gives the wig more volume. Let go and adjust the hair with your fingers.
As the wig is new - it will look flat so just press the top of the head and Mirai goes into "mad woman" mode - this gives the wig more volume. Let go and adjust the hair with your fingers.
16. The wig should look something like this after you have given it more volume in the previous step.
17. This is how the wig should be placed - a larger version of this thumbnail on Flickr.
"A" is where the position where the right braids start. "B" is the position where the left braid start - as you can see its lop sided. From "C" you can further see that the wig is slanted to Mirai's left and this is how the wig should be placed. Notice that the parting line is to the side of her face - *not* at the top of her forehead.
"A" is where the position where the right braids start. "B" is the position where the left braid start - as you can see its lop sided. From "C" you can further see that the wig is slanted to Mirai's left and this is how the wig should be placed. Notice that the parting line is to the side of her face - *not* at the top of her forehead.
18. This is how the beanie should be worn - show as much fringe as possible and make sure the wig is set as explained above.
19. To change busts, all you need to do is to use the procedures mentioned above to remove the head and arms which will leave you looking at the Mirai Frame like this.
Again - make sure the shoulder blades are in an upright position as you can see in the photo.
20. Bust transplant complete!
Dont forget the telescopic stand attached to the back of the inner tray.

Skin surface
1. Each Smart Doll is hand made in Japan - while they all look alike - they are actually ever so slightly different - the makeup on the face may be slightly different from others and she may also have beauty marks in different places too - none of these said points are defects and is a result of each doll being hand crafted as opposed to being machine made.
2. Due to the nature of the soft vinyl material that Mirai is made of, dark fabric colors will stain on her skin so do not dress her in anything dark.
3. Mirai does come in jeans and a T-shirt with red sleeves but I tested the fabric on her standing for a few months with no trace of color stains.
I did however do a test on a Mirai sitting down for a few months too and there was a small patch of jean stain on the thigh near the crotch area and figured that this was due to the pressure between the thigh and crotch area so don't have her sitting down for prolonged period of time. I did manage to wipe the stain off though.
If you remove her clothes as soon as you get her and find color stains then just mail me at support@smartdoll.jp and I will replace her for you by shipping a nekkid one to you. But my Mirai's did not stain after leaving her dressed standing up and don't think there should be a problem - no Smart Doll customers have had this problem (just ask them!) so far but if they eventually do I will update this section.
4. I mentioned this above in the production section but its important so I will mention it again - there may be a small (usually 0.01 mm wide) black dot just beneath the surface of some body parts which I have approved only if they look like beauty marks and not spots of dirt. If a beauty mark is located around the edges of the face that would be covered by the wig then I approve them - folks who prefer a spic n span surface should avoid purchasing Smart Doll.
5. I mentioned air pockets in the production sections above - I reject parts which have large air pockets but approve parts which may have extremely small ones in areas which are not so noticeable - but this is rare and may be a single air pocket 0.02mm wide at the back of the bust for example - folks who prefer a spic n span surface should avoid purchasing Smart Doll.
6. Paint thinner is your friend. It works wonders in removing dirt from the surface of the skin. Just soak a cotton bud and use it to gently wipe away any dirt that got on the skin.
Posing
1. While the frame is made of sturdy POM and the outer shell of soft vinyl, Mirai is still a delicate girl so please be gentle with her and don't put excessive force on any part of her body. Remember that her legs bend at the knees at only 90°. I designed the knees this way because I didn't want her knee joints to split open just to fold her legs 180°.
2. The jeans that come with Mirai are a bit of a tight fit - the reason is because I designed the jeans to show off her body line and long legs ^^;
When you want to sit her down, you may need to grasp her thighs and roll the jeans back and forth a bit upwards towards the hips - this makes it easier to let her sit down. Also, make sure her underwear is above the jean button to prevent the button pushing into her waist and leaving a mark.
When you want to sit her down, you may need to grasp her thighs and roll the jeans back and forth a bit upwards towards the hips - this makes it easier to let her sit down. Also, make sure her underwear is above the jean button to prevent the button pushing into her waist and leaving a mark.
3. The outer shell is made of soft vinyl which is a Shape-memory polymer. If Mirai wears tight clothes or you sit her down on a flat surface for prolonged periods of time, her bottom cheeks for example may become flat - all you need to do is to heat up the surface with a dryer and the piece will return to its original shape.
4. The term "Reset" in the Smart Doll world means to reset the joints after posing her. Have a look at the above image - the elbow joint is designed to move down when the elbow bends but you need to push it back into place after to "Reset" it.
5. The shoulder blades are designed to move for an extra degree of articulation but should also be Reset after posing - if you don't reset then it will look like Mirai is slouching.
To Reset the shoulder blades all you need to do is to hold and press Mirai's shoulders to make sure the shoulder blades are in a vertical position - also make sure the shoulder blades are the right way up as shown in the photo above.
6. Wrist joints should also be reset - make sure you push the wrist joint all the way into the forearm shell to leave no gaps.
7. If the head seems loose, its either because it moved up along the neck joint or because the bust was pushed down too far - both need to be reset. Hold the neck firmly and move upwards to straighten the spine. Always make sure the neck is in an upright position or it looks like Mirai is slouching and slouching is bad!
8. To change bust sizes you need to remove the head and arms first. Hold the bust by the neck with one hand and grab the shoulder arm with the other - then pull the arm off. Once you have done this to the other arm, remove the head by grasping and gently pulling it off - you can now remove the bust and replace it with another size.
9. The Smart Support Socket is not designed to be removed and should be a tight fit. If it gets removed for whatever reason, make sure its put back in place as its vital for the support of the whole frame system.
10. We use grease on all joints to ensure smooth but rigid movement. Initially from time to time the grease may seep out to the surface of the wrist, ankle or elbow joint - if that happens then just blob it with some tissue.
Apparel and Compatibility
1. Mirai does not like the heat so don't put her out in the sun for prolonged periods and definitely do not leave her in the car or by a hot window sill.
2 Mirai was designed so that you can change her eyes and wig - both of which may come loose during transit but can be easily fixed. If this happens don't panic!
If her eyes come loose (unlikely but possible) then just remove the wig and then the headcap. Then you can push the eyes back into place.
If her eyes come loose (unlikely but possible) then just remove the wig and then the headcap. Then you can push the eyes back into place.
3. The neck joint is just under 6mm wide meaning that you can fit any other doll head that has a larger neck socket. Some dolls however have very large neck socket - all you need to do is put a clear rubber tube over the neck joint - these are usually available at Tokyu Hands, DIY shop or an aquarium that sells those air tubes for the tank. Get one which is about 4mm wide.
4. Fatma Al Jassim has some photos comparing DD and SmartDoll on Facebook while Chun has photos covering compatibility with DD heads.
Hair Care
1. The wig fits around the head but I've kept it loose because many folks like to change the wigs - if you don't like your wig loose then you can use double sided tape or even blu-tac to keep the wig in place - I personally use blu-tac.
2. The braids are tied with some rubber bands but rubber bands inherently crack over time due to the nature of the material. Do what I do is go to a 100 yen shop (or equivalent in your neck of the woods) and get a box of small rubber bands to keep handy. I always carry some around with me in the event a rubber band snaps when I'm out n about with Mirai.
3. Always comb Mirai's hair from the bottom - combing from the top means that all you end up doing is tangling the hair at the bottom. You can use any comb for her hair - many folks do use a toothbrush - preferably one that does not have bits of spinach in it.
4. Mirai's wig should not be placed on her head symmetrically as I think it looks odd so I have the right side of the wig move forward which moves the parting line to the top left of her head - check out the photos in this post to see what I mean.
5. Mirai's beanie helps prevent her hair from getting ruffled when out n about but you may want to remove it from time to time - there is a way to remove the wig without ruffling her hair too much.
All you have to do is to place a finger on the top of her head and slowly roll up the edges of the beanie.
All you have to do is to place a finger on the top of her head and slowly roll up the edges of the beanie.
6. The hairclip is attached using a magnet in the clip and inside the head. The magnet in the clip had to be very small though so it falls off easily in transit.
The magnet inside the head can be removed and replaced with a stronger one if you like that you can get from a 100 yen store or equivalent.
The magnet inside the head can be removed and replaced with a stronger one if you like that you can get from a 100 yen store or equivalent.
Safety
1. Mirai is not a toy but many young folks like her so I am going to recommend that this product is for ages 6 and up with parental guidance.
2. There are some parts some of which have pointy bits so please be careful not to injure yourself or anybody.
3. Mirai does not like to be eaten so don't put any part of her in your or anybody else's mouth - and don't let your friends do the same when you are not looking either as it is a choking hazard.
4. Mirai’s head and hair clip contains a magnet which may interfere with pacemakers - if this is the case then you need to remove the wig, open the soft head cap and then remove the magnet which is held in place with some convenient blu-tac.
5. Whatever you do - make sure you don't feed Mirai after midnight.
6. Mirai Smart Doll does not like being dipped in water so don't do it!
Caring Tips
Just thought I'd add some maintenance tips with visuals. Most of you wont need any of this apart from the rubber bands.
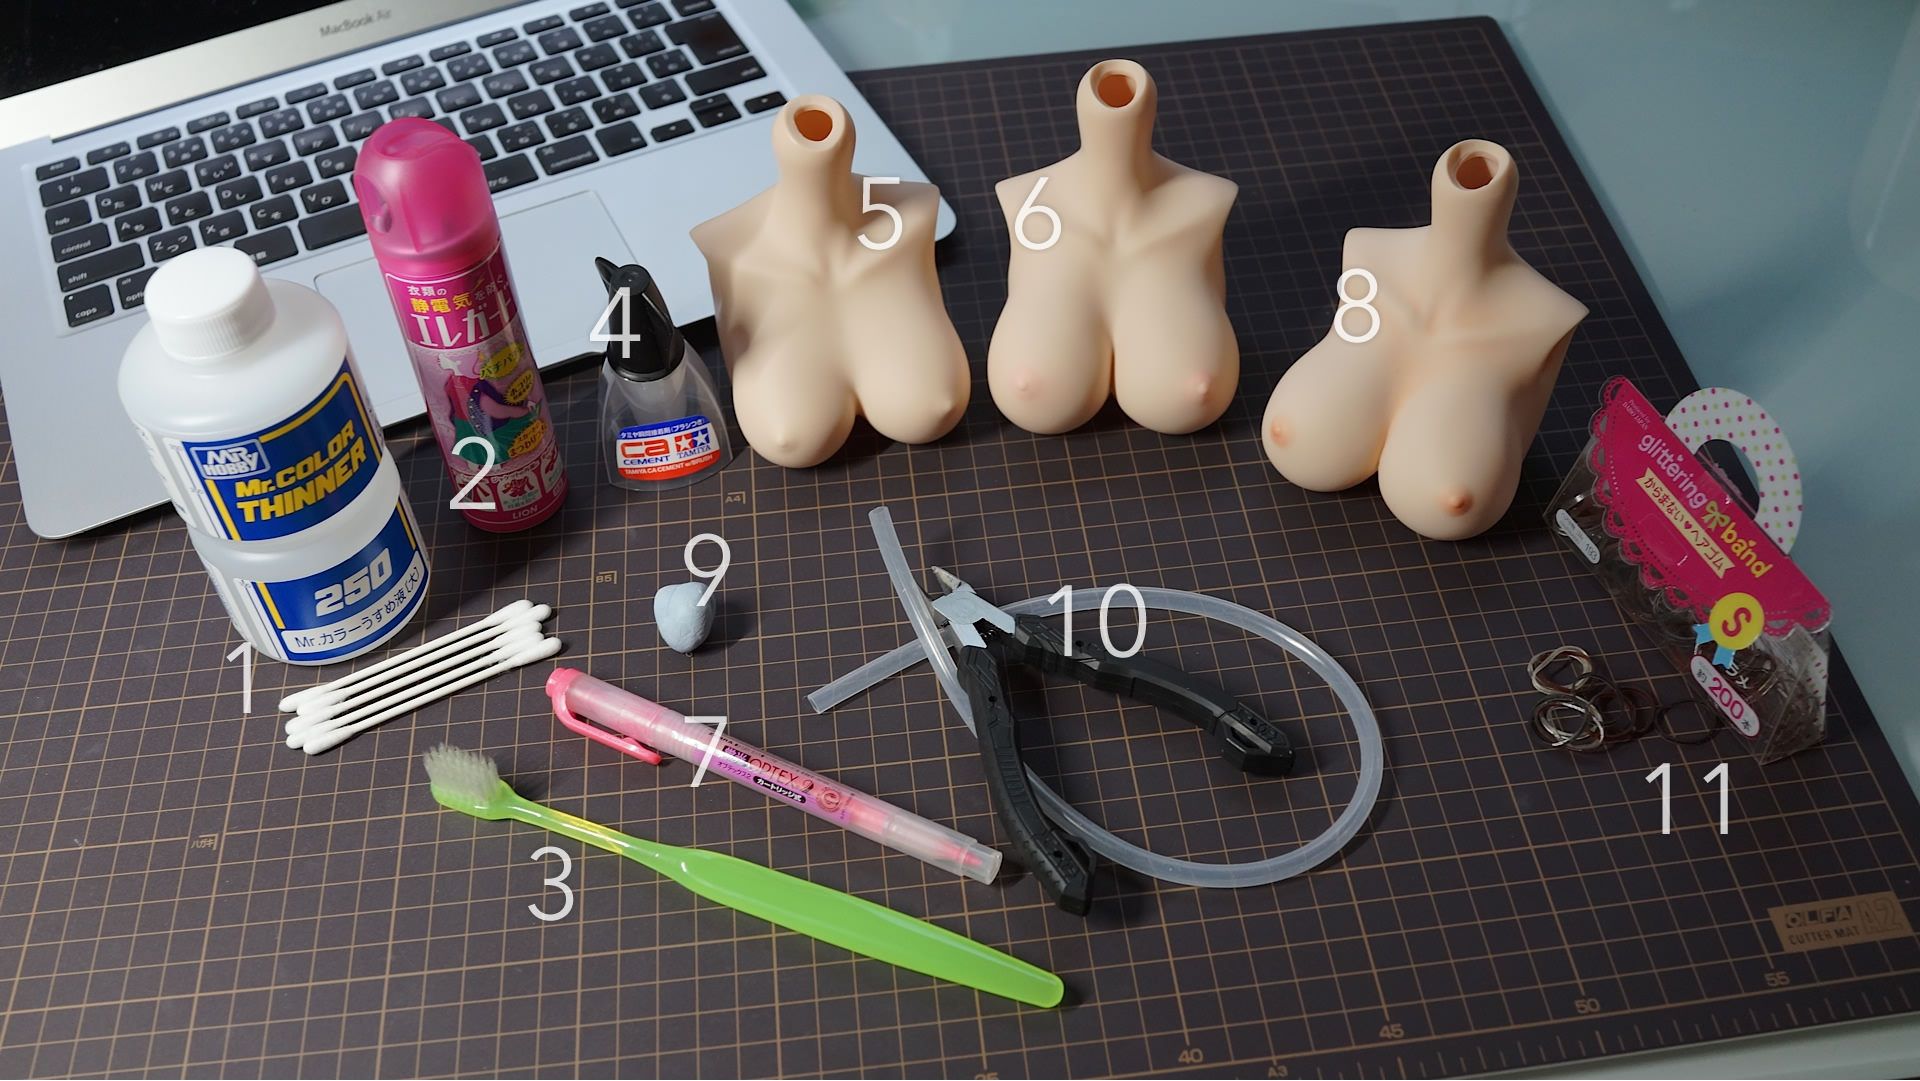
Item 1. This is paint thinner that you can get at most hobby shops - it does absolutely wonders for removing dirt or marks from the skin and does not harm the surface either. Dip cotton buds in the thinner and dab the affected part of the skin.
Item 2. This is a spray that one would normally use on clothes to prevent static electricity and is also another wonder for the wig. If you find Mirai's wig getting tangled all the time, use some of this spray to untangle it.
Item 3. Make sure you use a clean tooth brush and not one with bits of carrot in it - always comb from the bottom of the hair and when thats untangled then start to comb from the middle. you can use any comb though.
Item 4. This is brush on super glue for folks who want the wrist or foot slide joint to be more rigid - simply remove the foot or hand and brush some onto the slide joint and leave to dry. What this does is to increase surface area of the slide joint thus making it tighter. Make sure its dry before sticking back into the slot though.
Item 5. This is the sold-separately Medium Bust. By default, the rosebuds are not colored.
Item 6: This is the sold-separately Large Bust. Some folks like the rosebuds to have some color - if that is you then you can use Item 7 which is an pink marker pen - just dab the rosebud directly with the marker and blot with tissue. Its up to you what color to use ^^;
Item 7: Pink Marker pen - available from stationeries etc.
Item 8: This is the sold-separately Large Bust. The rosebuds and collar areas have been given a more realistic tone of shading by chalk and finished off with some matte top coat.
Item 9. Blu-tac - its always good to keep handy - whether its to keep the wig in place or have Mirai hold oddly shaped stuff in her hands.
Item 10. Rubber tubing available from many DIY shops - you would only really need this if you are using other doll heads on the Smart Body.
Item 11. You need these! Got this pack of 200 rubber bands for hair at a 100 yen shop.